Parser - Part 1: Fundamental parts of AST and basic statements
 Photo by Andrew Coop
"A parser is a software component that takes input data (frequently text) and builds a data structure – often some kind of parse tree, abstract syntax tree or other hierarchical structure – giving a structural representation of the input, checking for correct syntax in the process. [...] The parser is often preceded by a separate lexical analyser, which creates tokens from the sequence of input characters." - Wikipedia
So the idea of the parser will be to receive input data, can be text or tokens, and to produce a new data structure that represents this input data.
The data structure the parsers produce is commonly called AST, or abstract syntax tree. It's called "abstract" because this data structure omits visible details of the source code like semicolons, newlines, whitespace, and so on.
In the process of building this data structure, it also analyzes the source code, checking whether the generated tokens form a meaningful expression. This process is called Syntactic Analysis.
Parsing JSON strings as an example. It transforms the string input into a data structure (JavaScript Object).
const input = '{"name": "TK", "age": 25}';
const output = JSON.parse(input);

output;
=> { name: 'TK', age: 25 }

output.name;
=> 'TK'

output.age;
=> 25
It also has the "syntactic analysis". When passing a "wrong" input data, it will throw a syntax error (SyntaxError):
const input = '{"name": "TK", 25}';
const output = JSON.parse(input);
=> Uncaught SyntaxError: Unexpected number in JSON at position 15
In this case, position 15 is the value 25, where it is missing the attribute here.
Fundamental AST
To parse the Let Statement, let's first understand its syntax.
let x = 10;
let y = 15;

let add = fn(a, b) {
  return a + b;
};
Taking a closer look at this example, we can see a pattern here. All three statements have this same form:
let <identifier> = <expression>;
So, in this case, it's easy to understand that 10, 15, and fn are expressions. The difference between statements and expressions is simple in this PL: expressions produce value, statements don't.
And they are a fundamental part of the AST. Everything is a node in the tree, that can be a statement or an expression.
interface Node {
  tokenLiteral: () => string;
}
The first step is to create this Node interface. Every node has to implement this tokenLiteral function. Meaning: every node has a token literal associated with it.
export interface Statement extends Node {}

export interface Expression extends Node {}
The Statement and the Expression interfaces are built on top of the Node interface. Let's make it very simple now and improve later.
The other fundamental part of the AST is the Program. It's the root node of the AST and it contains a list of statements.
export class Program {
  statements: Statement[] = [];
}
Parsing the let statement
Now that we have the foundation for our AST, we can build more specific statements. And we'll start with the LetStatement.
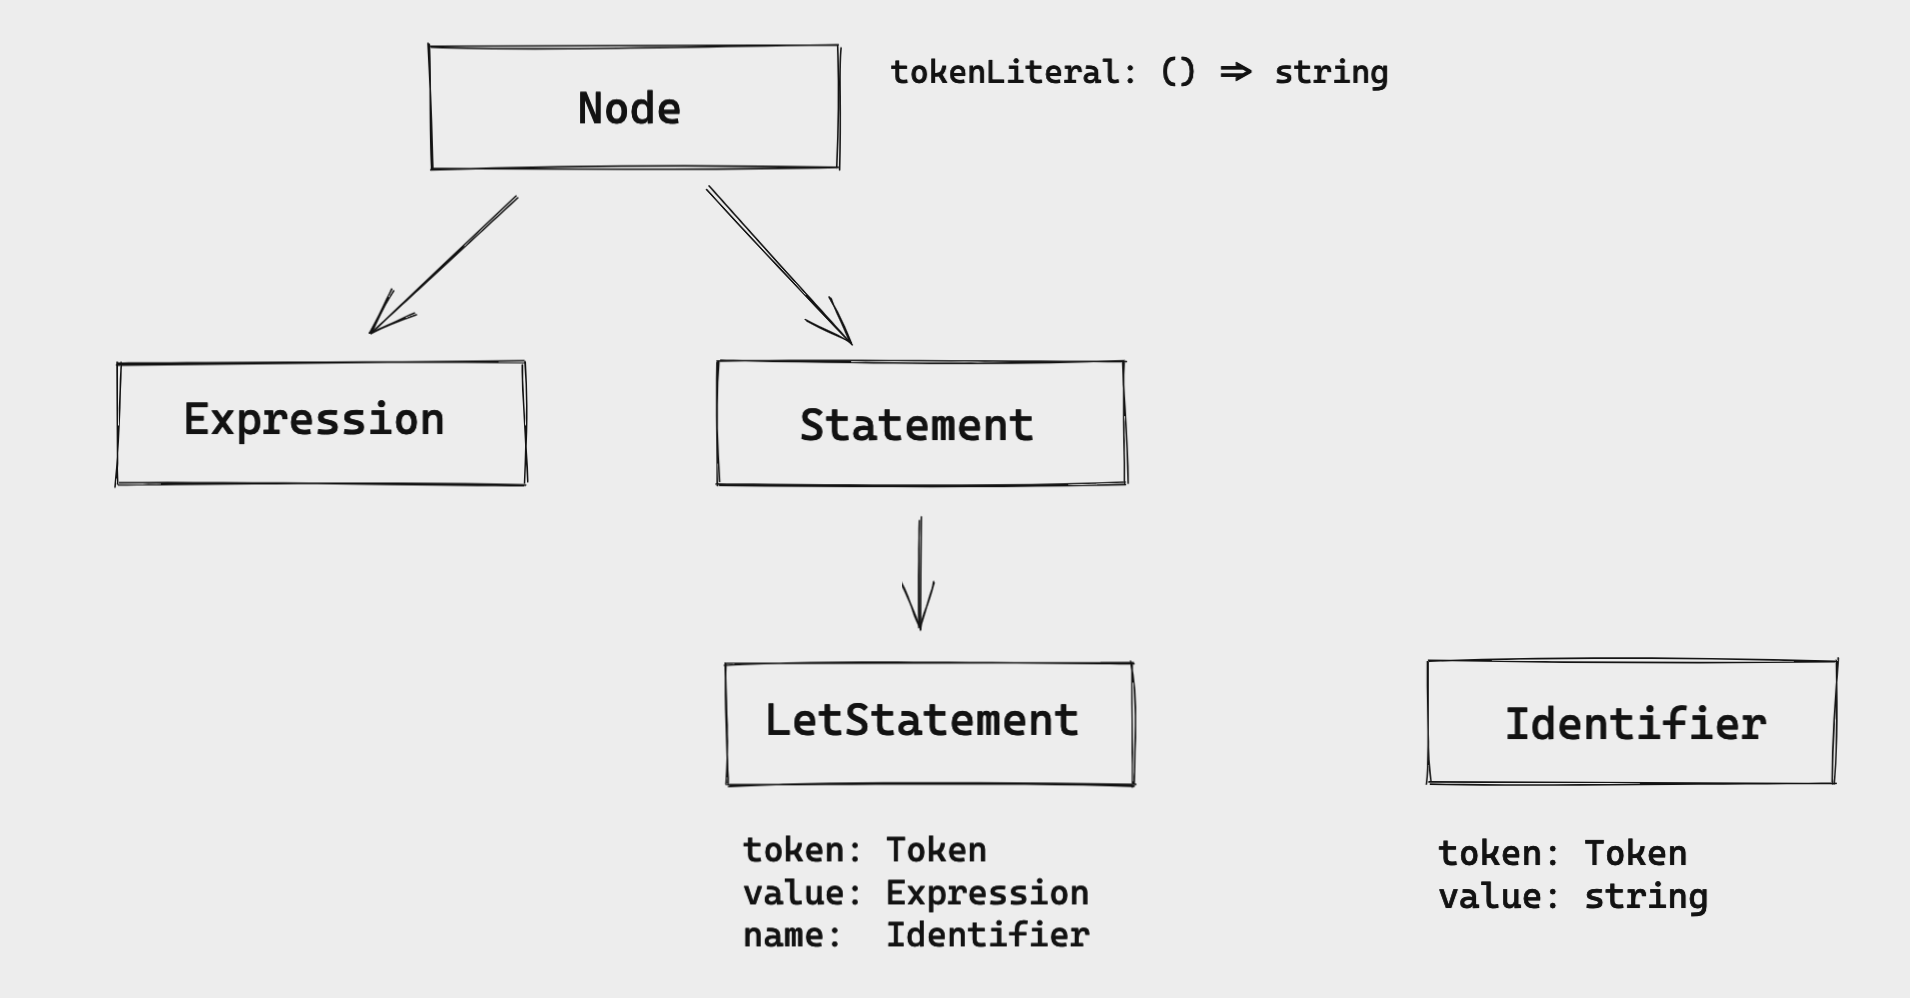
This is how I'm visualizing the relationship between the LetStatement and the other interfaces.
We start with "everything is a node". Then we have the two main interfaces: Expression and Statement. In this case, LetStatement implements the Statement interface.
The LetStatement has these attributes:
token: it has the type of theTokenclass we defined when we built the lexer. (just to refresh our memories, theTokenhas two attributes: thetype(string) andliteral(string). Thetypeis any token we defined in the enum and theliteralis the literal value of the token)value: it's anExpression. But we'll see more about this only in the next part of this series.name: it's anIdentifierthat has atokenand avalueas the attributes.
To illustrate how it works in the code, let's see this example
let x = 1;
The representation of the LetStatement's AST would be:
LetStatement {
  token: Token { type: 'LET', literal: 'let' },
  name: Identifier {
    token: Token { type: 'IDENT', literal: 'x' },
    value: 'x'
  }
}
We have the token that's the LET token and the name that's an Identifier with a token IDENT and the value as 'x'. We won't cover the value attribute because we'll see this Expression in the next part of this series.
With this in mind, we can create our LetStatement class:
class LetStatement implements Statement {
  token: Token;
  name: Identifier;
  value: Expression;

  constructor(token: Token) {
    this.token = token;
  }

  tokenLiteral() {
    return this.token.literal;
  }
}
It has everything we already discussed, but we are missing the Identifier implementation:
class Identifier implements Expression {
  token: Token;
  value: string;

  constructor(token: Token, value: string) {
    this.token = token;
    this.value = value;
  }

  tokenLiteral() {
    return this.token.literal;
  }
}
We also discussed this structure and what it should have: the token and the value.
Now we have all the necessary AST nodes to start to implement the parser. But before we build the parser and start parsing the LetStatement, we'll add tests to cover this implementation first.
describe('Parser', () => {
  describe('parseProgram', () => {
    it('parses the let statement', () => {
      const input = `
        let x = 5;
        let y = 10;
        let foobar = 10000;
      `;

      const lexer = new Lexer(input);
      const parser = new Parser(lexer);
      const program = parser.parseProgram();

      const tests = [
        { identifier: 'x' },
        { identifier: 'y' },
        { identifier: 'foobar' },
      ];

      tests.forEach(({ identifier }, index) => {
        const statement = program.statements[index];

        expect(statement.tokenLiteral()).toEqual('let');
        expect(statement.name.value).toEqual(identifier);
        expect(statement.name.tokenLiteral()).toEqual(identifier);
      });
    });
  });
});
We want the parser to parse this input
let x = 5;
let y = 10;
let foobar = 10000;
First, we pass the input to the Lexer and then the lexer to the Parser. And now we can call the parsePogram. It'll return the program with all the statements related to the input data.
What are we testing here?
- the statement token literal should be
'let'. - the identifier's value should the
identifierwe have in thetestsarray. - and the token literal of the identifier should also be the
identifier.
Now we can start implementing the Parser and pass the tests. We start with the basic definition of the Parser class.
class Parser {
  private lexer: Lexer;
  private currentToken: Token;
  private peekToken: Token;

  constructor(lexer: Lexer) {
    this.lexer = lexer;
  }
}
We need to make sure that the lexer is passed as a parameter and the parser should also have the:
currentToken: it is the token under examinationpeekToken: it is the next token that helps decide what to do next
We'll also have a method called nextToken to update the currentToken and the peekToken:
nextToken() {
	this.currentToken = this.peekToken;
  this.peekToken = this.lexer.nextToken();
}
And to initialize these two states, we can call this method two times in the constructor. Calling two times will set the correct state for the current and the next tokens. It looks like this:
constructor(lexer: Lexer) {
  this.lexer = lexer;
  this.nextToken();
  this.nextToken();
}
Now the parseProgram. The idea of this method is to create a program and parse each statement based on the tokens and add all the statements to the statements list in the program.
parseProgram() {
  const program = new Program();

  while (this.currentToken.type !== Tokens.EOF) {
    const statement = this.parseStatement();

    if (statement !== null) {
      program.statements.push(statement);
    }

    this.nextToken();
  }

  return program;
}
It iterates through all the tokens from the lexer, for each token, it'll parse the statement and add it to the statements list. And in the end, it'll just return the program.
From this code, we need to implement this parseStatement method.
private parseLetStatement() {
  const statement = new LetStatement(this.currentToken);

  if (!this.expectPeek(Tokens.IDENT)) {
    return null;
  }

  const identifier = new Identifier(
    this.currentToken,
    this.currentToken.literal
  );

  statement.name = identifier;

  if (!this.expectPeek(Tokens.ASSIGN)) {
    return null;
  }

  while (!this.currentTokenIs(Tokens.SEMICOLON)) {
    this.nextToken();
  }

  return statement;
}
I think this first implementation is not the best one, but we can refactor it later (I have some ideas in mind that I want to try later).
- The first thing is to create a new
LetStatementbased on the current token - Then we need to confirm that the next token is an
Identifier. If it's, we callnextTokento update the state of thecurrentTokenand thepeekToken. If not, we just returnnull(just to simplify for now). - Then we move to create the identifier. We just pass the current token and the current token's literal and update the statement name with this new identifier.
- We expect that the next token is a
=token (ASSIGN). - *TODO:* implement the expression/value in the next post of this series
- After that, we just go through all the tokens until we find the
;token and return the new statement.
This new statement will be used to add it to the statements list in the program. But we are missing two important methods here: expectPeek and currentTokenIs. Let's implement them.
private currentTokenIs(token: TokenType) {
  return this.currentToken.type === token;
}
currentTokenIs is a simple method to verify if the current token has the same token type that we expect it has.
private peekTokenIs(token: TokenType) {
  return this.peekToken.type === token;
}

private expectPeek(token: TokenType) {
  if (this.peekTokenIs(token)) {
    this.nextToken();
    return true;
  }

  return false;
}
The expectPeek method will use the peekTokenIs (that's very similar to the currentTokenIs, but for the peekToken) to verify if the token is the expected one. If it is, we update the current and the next token and return true. If not just return false (we'll also add error handling soon).
Now we have the parser, the program, and we can parse let statements making the tests pass.
Handling errors
For this input data let x = 5;, we don't have any syntax problem, so we won't have any error to handle. But imagine the PL user type this:
let 123;
let a;
There's a syntax error. Because, for a let statement, we expect that after the let token, we get an identifier, not the value/expression. And for the second example, after having the identifier, the parser expects that it has = token.
We could output something like this to the user:
let 123;
=> 'expected next token to be IDENT, got INT instead'

let a;
=> 'expected next token to be =, got ; instead'
Errors are ways to communicate to the users about what they are writing and help them get to the final goal (a "working software").
But how do we do that? Let's start with the tests as we always do.
it('parses an input with error', () => {
  const input = `
    let 123;
    let a;
  `;

  const lexer = new Lexer(input);
  const parser = new Parser(lexer);

  parser.parseProgram();

  const errors = parser.getErrors();
  const expectedErrors = [
    'expected next token to be IDENT, got INT instead',
    'expected next token to be =, got ; instead',
  ];

  errors.forEach((error, index) => {
    expect(error).toEqual(expectedErrors[index]);
  });
});
Here we have the input data that we talked about. But now we'll also have a getErrors method to get all the possible errors the parser had while parsing the input.
And we expect that the parser has these two errors we already discussed.
Ok, to have all the errors, let's create a list of errors in the parser.
type Error = string;

class Parser {
  private lexer: Lexer;
  private currentToken: Token;
  private peekToken: Token;
  private errors: Error[];

  constructor(lexer: Lexer) {
    this.lexer = lexer;
    this.errors = [];
    this.nextToken();
    this.nextToken();
  }
}
It's very simple, it's just a private attribute from the class Parser, it has the type Error (that's a string), and we initialize it with an empty list.
The getErrors method will only return the errors attribute:
getErrors() {
  return this.errors;
}
And now what we need to do is to add a error message when the parser gets an error.
In this case, we'll add an error to the list when the next token it's not the expected one, so the place we do that is in the expectPeek method.
private expectPeek(token: TokenType) {
  if (this.peekTokenIs(token)) {
    this.nextToken();
    return true;
  }

  this.peekError(token);
  return false;
}
When the next token is not the expected one, we call the peekError method passing the expected token to it. Now let's implement this new method:
private peekError(token: TokenType) {
  const msg = `expected next token to be ${token}, got ${this.peekToken.type} instead`;
  this.errors.push(msg);
}
It's very simple, we just need to add an error message to the errors list.
And syntax error message is also simple: expected next token to be ${token}, got ${this.peekToken.type} instead. We expect one thing and got another.
Running the tests again, they pass, and we have a way to communicate to the user about the program she/he is creating.
Parsing the return statement
The return is also a Statement. Let's illustrate it:
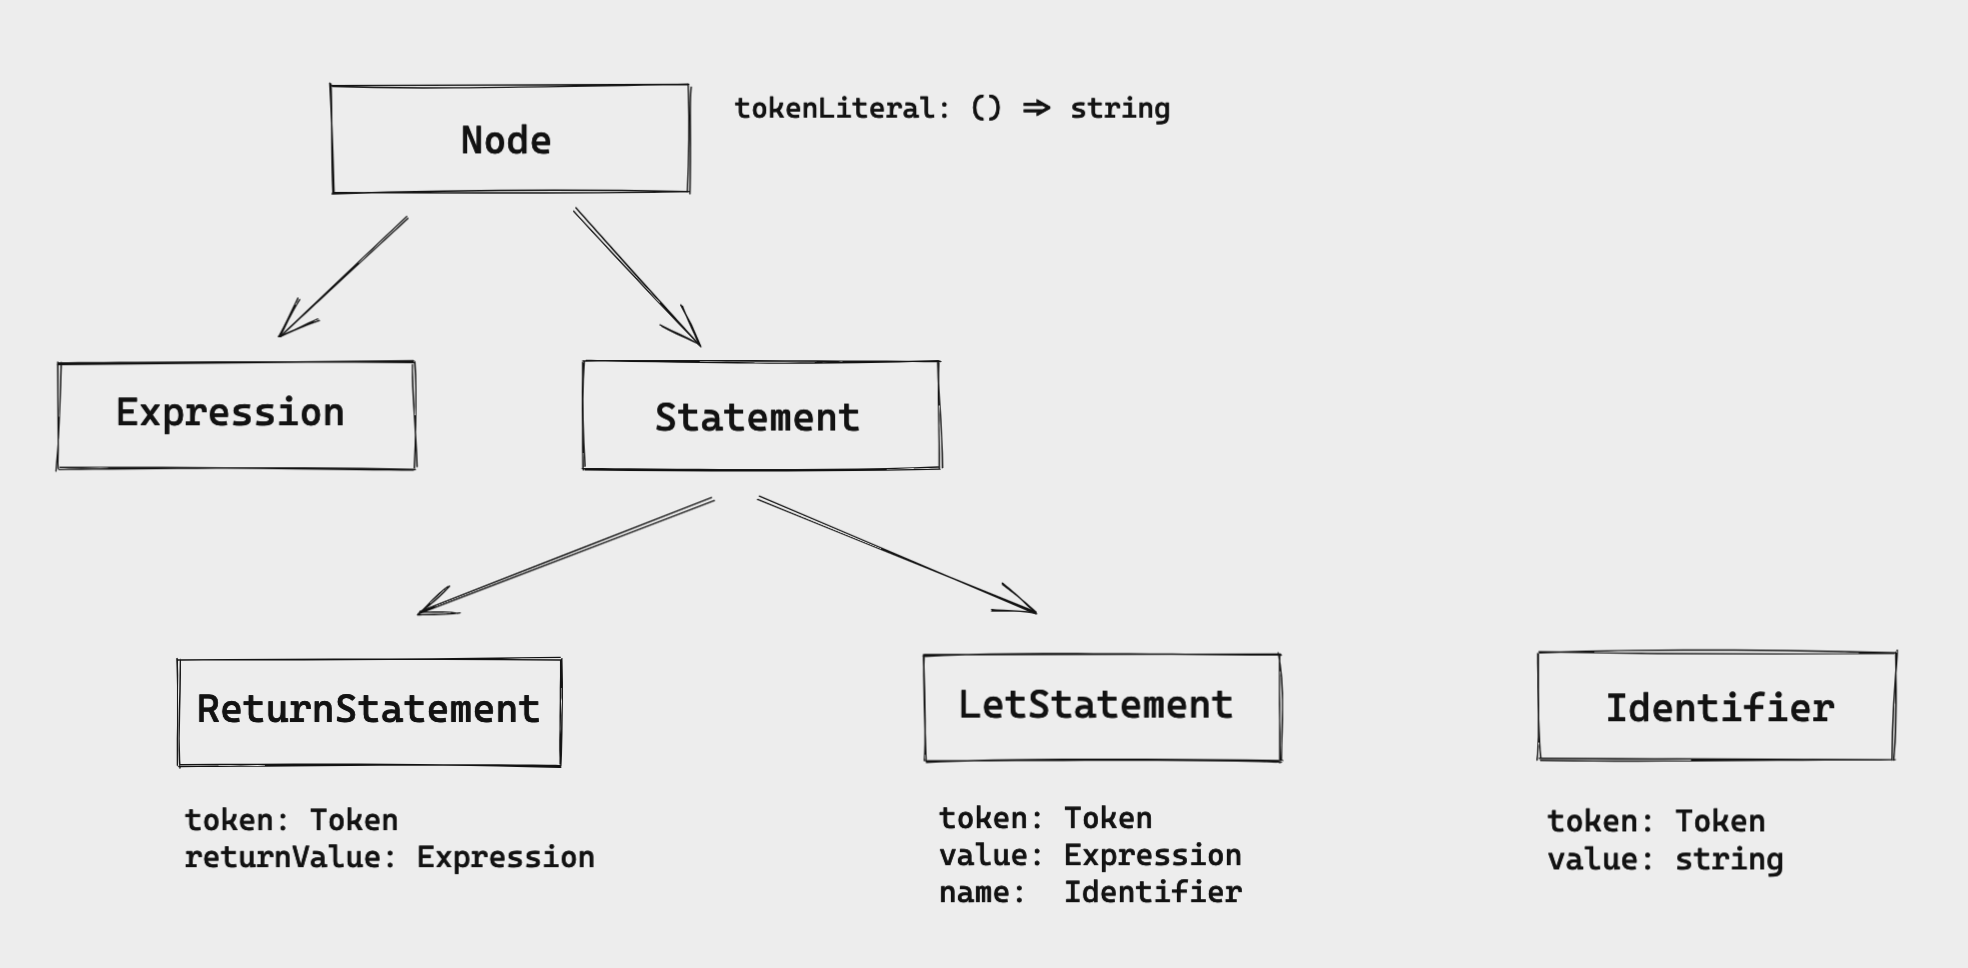
The ReturnStatement will implement this Statement interface and it has these two attributes: token and returnValue.
This is actually very similar to the LetStatement:
class ReturnStatement implements Statement {
  token: Token;
  returnValue: Expression;

  constructor(token: Token) {
    this.token = token;
  }

  tokenLiteral() {
    return this.token.literal;
  }
}
The token is a Token, the returnValue is an Expression, when instantiating the ReturnStatement, we initialize it with the token, and we also provide a tokenLiteral method.
Let's create a new test to verify this new statement:
it('parses the return statement', () => {
  const input = `
    return 5;
    return 10;
    return 10000;
  `;

  const lexer = new Lexer(input);
  const parser = new Parser(lexer);
  const program = parser.parseProgram();

  const tests = [
    { tokenLiteral: 'return' },
    { tokenLiteral: 'return' },
    { tokenLiteral: 'return' },
  ];

  tests.forEach(({ tokenLiteral }, index) => {
    const statement = program.statements[index];

    expect(statement.tokenLiteral()).toEqual(tokenLiteral);
  });
});
The input data has only correct return statements, and we expect that the statement token literal should be the return token.
When the program parses statements, we only handle the let statement. But we want to handle return statements as well.
private parseStatement() {
  switch (this.currentToken.type) {
    case Tokens.LET:
      return this.parseLetStatement();
    case Tokens.RETURN:
      return this.parseReturnStatement();
    default:
      return null;
  }
}
If the current token is a RETURN token, we call the parseReturnStatement method.
This method is also similar to the let statement, but simpler.
private parseReturnStatement() {
  const statement = new ReturnStatement(this.currentToken);

  while (!this.currentTokenIs(Tokens.SEMICOLON)) {
    this.nextToken();
  }

  return statement;
}
It creates the ReturnStatement passing the current token, go to the end of the statement (semicolon - we'll talk about the returnValue expression in another part of this series), and return the new statement.
This new statement is added to the statements list.
One small thing that I realized when implementing this new statement is that it also implements the Statement and the statements list doesn't know if it is a LetStatement or a ReturnStatement. One way to solve this in TypeScript is to add a tagged union.
Let's add the kind attribute to these two statements.
LetStatement:
class LetStatement implements BaseStatement {
  token: Token;
  name: Identifier;
  value: Expression;
  kind: StatementKind.Let;

  constructor(token: Token) {
    this.token = token;
    this.kind = StatementKind.Let;
  }

  tokenLiteral() {
    return this.token.literal;
  }
}
ReturnStatement:
class ReturnStatement implements BaseStatement {
  token: Token;
  kind: StatementKind.Return;
  returnValue: Expression;

  constructor(token: Token) {
    this.token = token;
    this.kind = StatementKind.Return;
  }

  tokenLiteral() {
    return this.token.literal;
  }
}
The two statements have a new attribute called kind and we initialize it with the expected statement kind.
enum StatementKind {
  Let = 'let',
  Return = 'return',
}
It's basically an enum to support this new attribute.
But we also need to update some things here:
type StatementKindType = StatementKind.Let | StatementKind.Return;
type Statement = LetStatement | ReturnStatement;

interface BaseStatement extends Node {
  kind: StatementKindType;
}

class Program {
  statements: Statement[] = [];
}
- The
StatementKindTypeis all possible kind types - The
Statementis all possible statements - The
BaseStatementis the interface thatLetStatementandReturnStatementimplement - The
Programstill have theStatementtype for the list of the statements
That's all for this post. The next one we'll talk about expressions, I'm excited about it.
Final words & Resources
If you didn't have the opportunity, take a look at the posts from the Building an Interpreter series:
- Building an Interpreter: Lexical Analysis - Part 1
- Building an Interpreter: Lexical Analysis - Part 2
- Building an Interpreter: Lexical Analysis - Part 3
- Building an Interpreter: REPL
These are the resources I'm using to learn more about this field:
- Crafting an Interpreter: the open-source project of the compiler for the TypeScript version of the Monkey programming language.
- Programming Language Theory: a bunch of resources about my studies on Programming Language Theory & Applied PLT.
- Writing an Interpreter in Go: the book I'm reading to learn and implement the Monkey compiler.