Crafting Frontend: React — Tag Input
 Photo by Alexandre Debiève
This post is part of the series Crafting Frontend, the React version.
Today we are going to implement a component I needed to develop in a real job interview. It's the Tag Input. So what's the specification? How should it work?
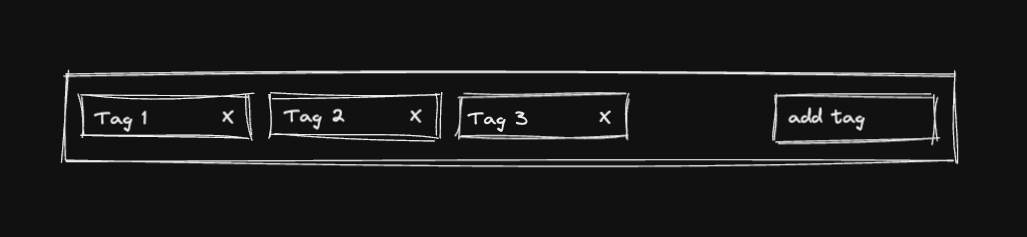
- It should list tags on the left and input on the right.
- The user should be able to write the new tag and click “enter”, it should add this new tag to the list of tags
- The user should be able to delete the tag from the list by clicking the “close” button (the
Xin each tag)
These are the minimum requirements. After reaching them, we can go deeper. But let's start with them first.
Component Architecture
Let's talk about component architecture.
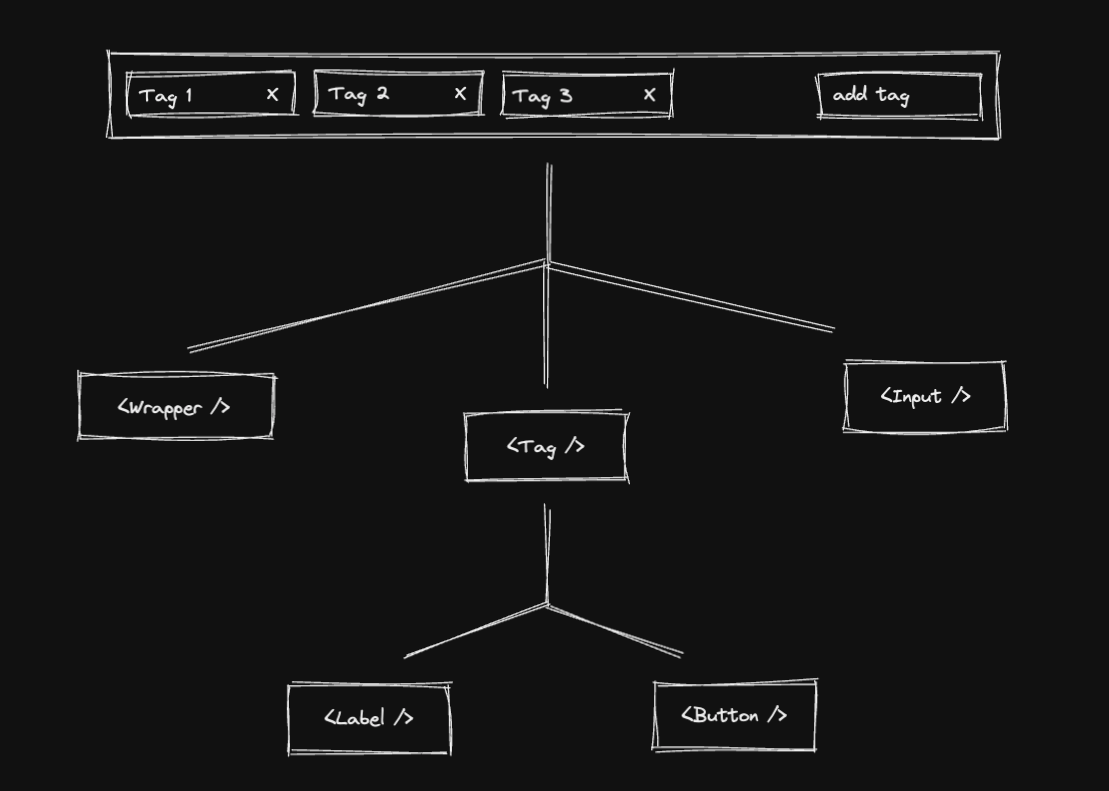
From the UI, let's break down each UI part into separate components.
<Wrapper />: this component will wrap the tag and the input together<Tag />: it renders a tag and handles its deletion<Input />: it renders the input and handles the new tag addition<Label />: just renders the tag text<Button />: it handles the tag deletion
With that in mind, we could start implementing each component. But before that, let's think a bit about the data structure we want to use to represent the tags list state in our component.
Thinking about Data Structures
So what are the common operations for this component? Let's list them:
- List/renders the list of tags
- Add a new tag to the list
- Delete a given tag from the list
That's it!
If we think about sets, arrays, and objects, all can render/list without any problem.
To add a new tag to the list, all three are possible too, but if we need to handle uniqueness, the array list has worse performance as it needs to traverse the whole list to check if it's possible to add this new tag to it without compromising the uniqueness of data. In comparison, sets already implement the uniqueness concept out of the box, and objects can check if the tag is already in it in O(1).
When talking about deletion, if we have the tag to be deleted, objects can do this operation in O(1). Arrays list and sets need to traverse the whole list to remove the tag, but not only that, it needs to shift all elements to the left in the worst-case scenario (when deleting the first tag).
Cool! It seems an object will be very handy for this component implementation.
Handling component state
Before going into the component implementation, let's take a step back and talk about state management. Again, listing the feature is important to see how we need to handle the state, that we know now that it will be an object.
Thinking about listing, adding, and deleting, I wanted to create the functions API in a central place and provide them to any component that needs to use them. Let's use the Context API then.
The first thing we need is to create the state.
const [tags, setTags] = useState({});
I added an empty object as the default value of tags but we can make it dynamic by getting the default value as a component prop. We will talk about it later on.
To list the tag is pretty simple. I chose to use the Object.entries to be able to iterate through the list and keep the key and the value of each tag.
const allTags = Object.entries(tags);
When iterating the list, we will do something similar to this:
allTags.map(([tagId, tag]) => {
  // do something here
});
Let's add it to the value object we will provide to each component:
const value = {
  allTags,
};
Removing a tag is also a simple task. We can use the delete function to remove the key-value from the object based on the tag we want to delete. Another approach is to use a more functional, or better, an immutable approach to “delete” a key-value from an object: using the JS Object spread syntax.
const removeTag = (tag) => {
  const { [tag]: _, ...updatedTags } = tags;
  setTags(updatedTags);
};
Just build a new object based on the tags without the tag-to-be-deleted. And set as the new tags.
Adding a new tag to the object is the most interesting one because we need to handle tag “uniqueness”.
One important rule before:
- Test ≠ test ≠ tesT ≠ tEsT
- test 1 ≠ test-1 ≠ test_1
We can all these together in the same tags object. But we can add a new Test value if the object has an existing Test value already. In other words, it has uniqueness but it is case-sensitive.
To know if the tag exists in the tags object, let's simply create a function to handle this logic for us:
const hasTag = (tag) => (tags[tag] ? true : false);
To add a new tag, we will use this function to check if we can add it to the object. So the addTag function implementation looks like this:
const addTag = (newTag) =>
  !hasTag(newTag) &&
  setTags({
    ...tags,
    [newTag]: newTag,
  });
If it has the new tag already, we don't need to do anything. If it doesn't, update the tags object with the new tag.
Now that we have all the functions APIs done, we can create our context and provide them to all the wrapped components.
As we saw here, we have some steps. Let's do them.
Create the context
const TagInputContext = createContext();
Create the provider component
const Wrapper = ({ children }) => {
  const [tags, setTags] = useState({});
  const value = {};

  return (
    <TagInputContext.Provider value={value}>
      {children}
    </TagInputContext.Provider>
  );
};
Pass the state values to the value object: Now the value is empty and we need to fill it with the APIs we built earlier.
const Wrapper = ({ children }) => {
  const [tags, setTags] = useState({});

  const removeTag = (tag) => {
    const { [tag]: _, ...updatedTags } = tags;
    setTags(updatedTags);
  };

  const allTags = Object.entries(tags);
  const hasTag = (tag) => (tags[tag] ? true : false);

  const addTag = (newTag) =>
    !hasTag(newTag) &&
    setTags({
      ...tags,
      [newTag]: newTag,
    });

  const value = {
    allTags,
    addTag,
    removeTag,
  };

  return (
    <TagInputContext.Provider value={value}>
      {children}
    </TagInputContext.Provider>
  );
};
We are good to go now. After creating our TagInput, we will wrap all the children components with this provider wrapper and all the components will have access to these APIs. Getting the functions from the context is super simple.
We use useContext passing the TagInputContext, and the returned value is the value provided by the provider. An example of usage:
const { allTags, addTag, removeTag } = useContext(TagInputContext);
Super simple, right?
Now:
- Component Architecture is done ✅
- Choosing the data structure is done ✅
- State management is done ✅
Finally, we are able to build our components.
Component Implementation Details
The Tag, Label, and Button components
Let's start with the <Label /> and the <Button /> components as they are very simple.
The <Label /> is just a wrapper for the span.
const Label = ({ children }) => <span>{children}</span>;
That's it.
And the <Button /> is a bit more complex but not that much. We need to render the button element and delete the tag (via removeTag we implemented earlier).
To remove the tag, we need to receive its “id”.
const Button = ({ tagId }) => {
  const { removeTag } = useContext(TagInputContext);

  return <button onClick={() => removeTag(tagId)}>X</button>;
};
This is the very first implementation:
- It receives the
tagIdas a prop value to use to remove the tag - Gets the
removeTagfrom the context removeTaggets called on the button click
The <Tag /> component is only a “wrapper” for these two components we have just implemented.
const Tag = ({ tagId, tag }) => (
  <span>
    <Label>{tag}</Label>
    <Button tagId={tagId} />
  </span>
);
To render the tag, we need the tag label and the tag id. With that, we can now render a tag in the browser and delete it. But this is just one tag, we need a list of them.
The Tags component
The <Tags /> component just needs to render all the tags. So the idea here is to get all the tags in the context state, iterate through them, and use the <Tag /> component to render them.
const Tags = () => {
  const { allTags } = useContext(TagInputContext);

  return (
    <div>
      {allTags.map(([tagId, tag]) => (
        <Tag key={tagId} tagId={tagId} tag={tag} />
      ))}
    </div>
  );
};
Getting all the tags is similar to what we've done with the removeTag API. Just use the context. We use map to iterate and render them based on the <Tag /> component. This is important to notice the allTags is an “object entries”, this is why we have this syntax to restructure each “tag”: [tagId, tag].
But that's it. All the tags are being rendered now. We still need a way to add new tags to the list.
The Input component
For the input component, we need to handle the addition of new tags to the list. We'll need to use the addTag function we created before, but before this, let's create the component and handle the state for the new tag.
const Input = () => {
  const [newTag, setNewTag] = useState('');
  return <input value={newTag} />;
};
This is the first version. We have a newTag state and it will be the input value. But we need to update the newTag value every time the user types a new character in the input.
const Input = () => {
  const [newTag, setNewTag] = useState('');

  const updateTag = (event) => {
    setNewTag(event.target.value);
  };

  return <input onChange={updateTag} value={newTag} />;
};
This is the second version with the onChange, meaning, every time the user types a new character in the input, we'll update the newTag value.
And now, to add the newTag to the tags list, we need to listen when the user types Enter. We handle this with the onKeyDown event listener when the key is 'Enter'.
Here's the full version:
const Input = () => {
  const [newTag, setNewTag] = useState('');
  const { addTag } = useContext(TagInputContext);

  const updateTag = (event) => {
    setNewTag(event.target.value);
  };

  const handleEnter = (event) => {
    if (event.key === 'Enter') {
      addTag(newTag);
      setNewTag('');
    }
  };

  return <input onChange={updateTag} onKeyDown={handleEnter} value={newTag} />;
};
We just need to get the addTag function from the context and call it when the Enter key is pressed. We also set the newTag value to an empty string to clean the input value.
The Wrapper component
The last part is to use the wrapper to “wrap” all the components we've created to enable them to get the provided values from the context.
const TagInput = () => (
  <Wrapper>
    <Tags />
    <Input />
  </Wrapper>
);
That's it. Super simple!
Now we can use it as a generic component to be used in any part of our application. Another interesting idea we can implement in the TagInput component is the default tags. And we just need to enable it as a prop for the component.
const TagInput = ({ defaultTags }) => (
  <Wrapper defaultTags={defaultTags}>
    <Tags />
    <Input />
  </Wrapper>
);

// Usage
const defaultTags = { tag1: 'tag1', tag2: 'tag2' };
const Page = () => <TagInput defaultTags={defaultTags} />;
That's it! This is an interesting challenge I had in a coding interview and I wanted to reimplement it and document the whole process. I hope this can be a good learning resource for you to continue crafting your frontend applications.
If you want to see a live demo of our <TagInput /> component, take a look at here: Crafting Frontend — Tag Input
Crafting Frontend is a series of posts and experiments I'm doing to craft the art of frontend engineering. To see all the experiments I've been doing, follow the Crafting Frontend github repo.