Crafting Frontend: React — Nested Comments Component
 Photo by Erik Mclean
This post is part of the series Crafting Frontend, the React version.
In the past, I had an interview with a big tech company and one of the steps of the interview process was a JavaScript/Frontend coding challenge. This challenge was to build a nested comments feature. In React. Similar to Reddit. I'll make sure to show you how I did implement it.
You can see how it works in this video:
But you can also take a look at this demo.
Before starting to implement, let's talk about all the features it was requested:
- It should render and list all the comments and nested comments. The nesting level can be infinite.
- It should be able to add new comments and reply to comments.
- It should be able to delete an existing comment or reply.
- If deleting a comment with nested replies, it should delete everything.
Choosing a data structure & Payload example
The comment needs to have some information like the text, author, edited, and replies. So it would be like this:
{
  text: 'comment',
  author: 'TK',
  edited: false,
  replies: []
}
But the replies could be an array or an object. For this implementation, it didn't really matter that much because I wanted to access the replies based on the index and handling with an index, it doesn't really matter if it's an array or an object. By the way, using an array, in this case, would be much easier because I don't need to handle the index for each comment, the data structure automatically handles this for me.
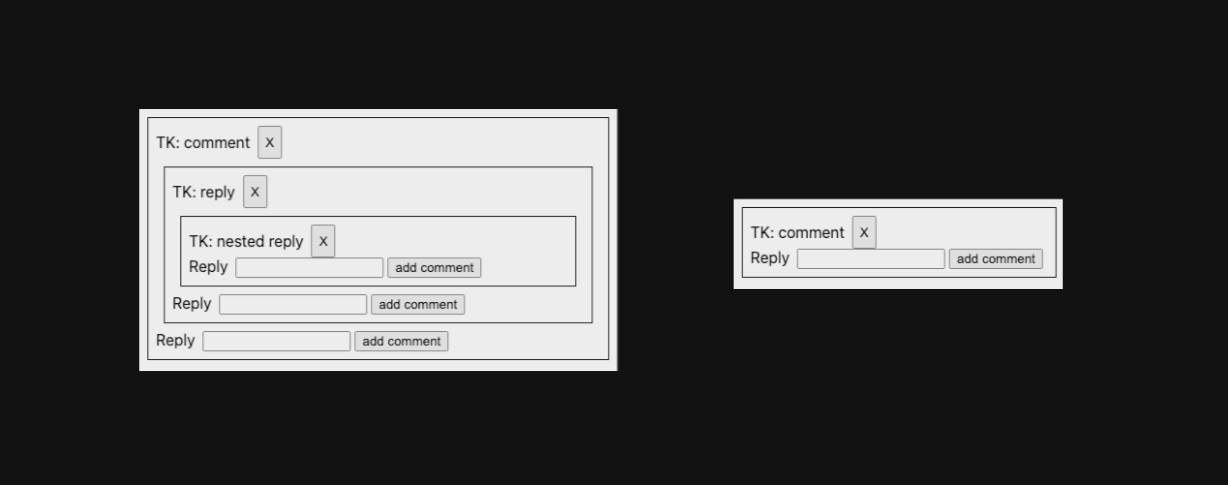
An example of a comment with nested replies would be something like this:
[
  {
    text: 'comment',
    author: 'TK',
    edited: false,
    replies: [
      {
        text: 'reply',
        author: 'TK',
        edited: false,
        replies: [
          {
            text: 'nested reply',
            author: 'TK',
            edited: false,
            replies: [],
          },
        ],
      },
    ],
  },
];
- We have a comment as the first comment in the list of comments
- We have one reply to that comment
- And we have a reply for the reply
With that, it gives us a hint that we can *maybe***** use recursion to render this data. But let's talk about it later on.
To add a new reply, we need the indices and push a new comment/reply to the list:
comments[0].replies[1].replies.push(newComment);
In this case, we are adding a new comment to the replies of the second reply of the first comment in the list of comments. I could even use the name comments as an attribute rather than replies but I thought replies make more sense in this case, semantically speaking.
From UI to components
From this UI, we can think about the components we need to implement.
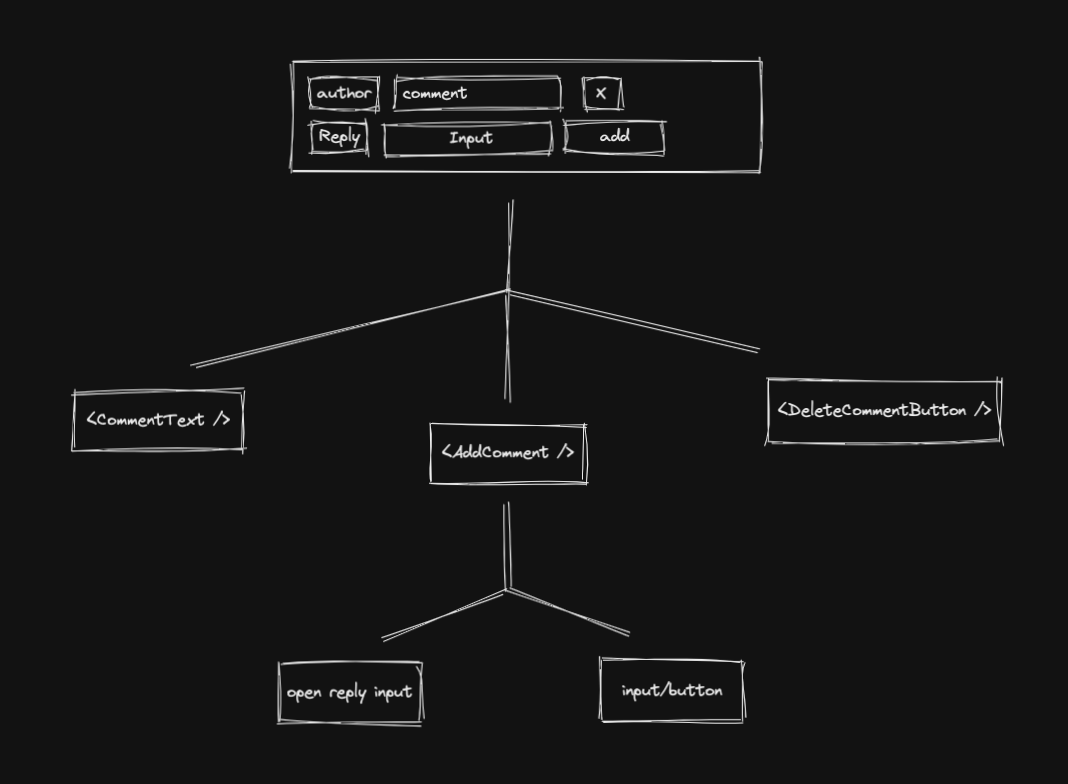
- We have
<CommentText />that will hold the author and the text of each comment <DeleteCommentButton />is just a button element to be able to delete the given comment/reply- And
<AddComment />that will hold two other elements: the open reply input/button and the actual input/button to add a new comment
The UI part of each component can be implemented and I'll let the logic and state parts for us to talk about it soon. So let's focus on the UI.
This is the structure I created for the <Comment /> component.
const Comment = ({ text, author }) => (
  <CommentWrapper>
    <CommentTextWrapper>
      <CommentText>
        {author}: {text}
      </CommentText>
      <DeleteCommentButton />
    </CommentTextWrapper>
    <AddComment />
  </CommentWrapper>
);
Let's start with the <CommentText />:
const CommentText = ({ children }) => <p>{children}</p>;
Simple as that. It should receive the children (a text), and render the text wrapped by a paragraph element. The other approach is to add the author and text as props and render them manually within the <p> element. This will enable us to render any text we want. It gives more power to the parent component.
The <DeleteCommentButton /> is simple as the previous component.
const DeleteCommentButton = () => <button>X</button>;
For now, we just want to focus on the UI so we will implement the click behavior later. Just a button element with the text X.
Compared to the previous components, the <AddComment /> is a bit more complex as we need to handle the click for the “Reply” button/label to show or hide the new comment input/button, but nothing out of this world. Just a simple boolean state.
const AddComment = () => {
  const [isReplyInputOpen, setIsReplyInputOpen] = useState(false);
  const handleReplyInputOpen = () => setIsReplyInputOpen(!isReplyInputOpen);

  return (
    <>
      <span onClick={handleReplyInputOpen}>Reply</span>
      {isReplyInputOpen ? (
        <>
          <input />
          <button>add comment</button>
        </>
      ) : null}
    </>
  );
};
- We have the “Reply” label, clicking, it will show or hide the input/button to create a new comment
- We also have the input and the button to add a new comment. No behavior implementation now, just the UI
Nested comments & Recursion
Now that the UI part of the <Comment /> component is done, we can focus on rendering a list of comments.
The <Comments /> component should receive a list of comments as a prop, iterate through it and render the <Comment /> with each comment data.
const Comments = ({ comments }) =>
  comments.map((comment, index) => (
    <Comment
      key={`${index}-${comment.text}-${comment.author}`}
      text={comment.text}
      author={comment.author}
      edited={comment.edited}
      replies={comment.replies}
    />
  ));
Simple as that.
- Receive the
commentslist - Iterate through the
commentslist - Render the
<Comment />with each comment data
Keep in mind that we passed the replies data but we didn't discuss it yet. To render all nested comments, we use only the <Comments /> and <Comment /> components and recursion. No need for any additional components here.
In the <Comment /> component we now receive the replies list and we can render the <Comments /> passing this data to it.
const Comment = ({ text, author, replies }) => (
  <CommentWrapper>
    <CommentTextWrapper>
      <CommentText>
        {author}: {text}
      </CommentText>
      <DeleteCommentButton />
    </CommentTextWrapper>
    <Comments comments={replies} />
    <AddComment />
  </CommentWrapper>
);
Now we handle all nested replies too. When a recursion solution fits well, it feels so natural and simple to implement.
To test our implementation, we can even pass a hard-coded comments list to the component.
const comments = [
  {
    text: 'comment',
    author: 'TK',
    edited: false,
    replies: [
      {
        text: 'reply',
        author: 'TK',
        edited: false,
        replies: [
          {
            text: 'nested reply',
            author: 'TK',
            edited: false,
            replies: [],
          },
        ],
      },
    ],
  },
];

const Page = () => <Comments comments={comments} />;
Now we can see the main comment and all its nested replies. It works for any level.
The context API — Handling State Management
We'll use the React Context API together with useState to handle state management.
Let's start with the basics: creating the CommentsContext and the CommentsProvider.
const CommentsContext = createContext();

const CommentsProvider = ({ children }) => {
  const providerValue = {};

  return (
    <CommentsContext.Provider value={providerValue}>
      {children}
    </CommentsContext.Provider>
  );
};
The comments state will be here so let's start with it.
const CommentsProvider = ({ children, initialComments }) => {
  const [comments, setComments] = useState(initialComments);

  const providerValue = {
    comments,
  };

  return (
    <CommentsContext.Provider value={providerValue}>
      {children}
    </CommentsContext.Provider>
  );
};
We define the comments state and pass it to the provider value. To make it more flexible, we can add the possibility of passing an initialComments data to the provider. This is interesting because we can use this component together with requesting actual data from an API and passing it to the component.
Now that we have our provider, we can start handling the state of each component. Let's start with adding a new comment to the comment list.
The first implementation is to have the actual comment to be added. It all starts with a comment state in the provider.
const [comment, setComment] = useState();
With that new state, we can pass a handler function for input to change the text and update it. The function is super simple.
const handeCommentChange = (event) => {
  setComment({
    text: event.target.value,
    author: 'TK',
    edited: false,
    replies: [],
  });
};
It just needs to get the event, accesses the target value, and update the comment with the setComment setter hook. I hard-coded the author to simplify but we can discuss how we would make it generic enough to handle different comment's authors.
The text is the input value, the edited is false, and there are no replies yet. Now we can provide this new function to any component wrapped in our provider. More specifically, we want to provide it to the <AddComment /> component. Let's see the whole provider now.
const CommentsProvider = ({ children, initialComments }) => {
  const [comments, setComments] = useState(initialComments);
  const [comment, setComment] = useState();

  const handeCommentChange = (event) => {
    setComment({
      text: event.target.value,
      author: 'TK',
      edited: false,
      replies: [],
    });
  };

  const providerValue = {
    handeCommentChange,
    comments,
  };

  return (
    <CommentsContext.Provider value={providerValue}>
      {children}
    </CommentsContext.Provider>
  );
};
That's nice! Let's use it on the <AddComment /> component.
const AddComment = () => {
  const [isReplyInputOpen, setIsReplyInputOpen] = useState(false);
  const { handeCommentChange } = useContext(CommentsContext);
  const handleReplyInputOpen = () => setIsReplyInputOpen(!isReplyInputOpen);

  return (
    <>
      <span onClick={handleReplyInputOpen}>Reply</span>
      {isReplyInputOpen ? (
        <>
          <input onChange={handeCommentChange} />
          <button>add comment</button>
        </>
      ) : null}
    </>
  );
};
As we saw in another article, we consume this function by using the useContext hook, passing the CommentsContext, and that's the handleCommentChange function we have just created.
If the user types anything, we can see it's updating our own comment state now.
Let's handle the implementation of the comment addition now.
We have an empty list in JavaScript: []. We need to add a new comment to it, how do we do it?
const comments = [];
comments.push(comment);
Right? Let's start with it first.
To handle the addition of a comment to the root of the comments list, we just need to do the same idea as above: push the new comment to the comments but we can use the setComments we have created earlier rather than the push method.
const handleCommentAddition = () => {
  setComments(comment);
};
Simple as that. Now the whole provider has this new function and we provide it to the components:
const CommentsProvider = ({ children, initialComments }) => {
  const [comments, setComments] = useState(initialComments);
  const [comment, setComment] = useState();

  const handeCommentChange = (event) => {
    setComment({
      text: event.target.value,
      author: 'TK',
      edited: false,
      replies: [],
    });
  };

  const handleCommentAddition = () => {
    setComments(comment);
  };

  const providerValue = {
    handeCommentChange,
    handleCommentAddition,
    comments,
  };

  return (
    <CommentsContext.Provider value={providerValue}>
      {children}
    </CommentsContext.Provider>
  );
};
The <AddComment /> component can now consume this new function and use it when the user clicks the add comment button.
const AddComment = () => {
  const [isReplyInputOpen, setIsReplyInputOpen] = useState(false);
  const { handeCommentChange, handleCommentAddition } =
    useContext(CommentsContext);
  const handleReplyInputOpen = () => setIsReplyInputOpen(!isReplyInputOpen);

  return (
    <>
      <span onClick={handleReplyInputOpen}>Reply</span>
      {isReplyInputOpen ? (
        <>
          <input onChange={handeCommentChange} />
          <button onClick={handleCommentAddition}>add comment</button>
        </>
      ) : null}
    </>
  );
};
Pretty much the implementation we did for the handleCommentChange function.
But now, the most interesting part of this implementation. We need to handle this for any comment addition: for the comments list, for a reply to the first comment, for a reply of a reply, and so on.
Remember when we talked about adding a new comment to a nested reply?
comments[0].replies[1].replies.push(newComment);
Here again, we are adding a new comment to a second reply of the first comment in the list of comments.
Some parts will always be the same
commentsrepliesreplies- …
The variables are: the index of comments in the comments list and the index of the reply for the first comment.
So the idea is to have all the indices or ids of all comments and replies. How do we store it? What about a simple list?
[0, 1];
This means we have the first comment (index 0) and the second reply to the first comment (index 1).
To have a list of ids, we need to start from the top (component). It starts with an empty list.
const Comments = ({ comments, ids = [] }) =>
  comments.map((comment, index) => (
    <Comment
      key={`${index}-${comment.text}-${comment.author}`}
      text={comment.text}
      author={comment.author}
      edited={comment.edited}
      replies={comment.replies}
      index={index}
      ids={ids}
    />
  ));
The <Comments /> component receives the ids as a prop and starts with an empty list. It passes it to each <Comment /> component. Also notice we are passing the index of each comment. So we enable each comment to add its index to the list of ids.
In the <Comment />, we need to add the index of the current comment to the list of ids. We pass it to the <Comments /> component but also to the <AddComment /> component.
const Comment = ({ text, author, replies, index, ids }) => (
  <CommentWrapper>
    <CommentTextWrapper>
      <CommentText>
        {author}: {text}
      </CommentText>
      <DeleteCommentButton />
    </CommentTextWrapper>
    <Comments comments={replies} ids={[...ids, index]} />
    <AddComment ids={[...ids, index]} />
  </CommentWrapper>
);
Now the <AddComment /> has access to the ids and it can be used to add a new comment to the appropriate place.
const AddComment = ({ ids }) => {
  const [isReplyInputOpen, setIsReplyInputOpen] = useState(false);
  const { handeCommentChange, handleCommentAddition } =
    useContext(CommentsContext);

  const handleReplyInputOpen = () => setIsReplyInputOpen(!isReplyInputOpen);

  return (
    <>
      <span onClick={handleReplyInputOpen} style={{ marginRight: '8px' }}>
        Reply
      </span>
      {isReplyInputOpen ? (
        <>
          <input style={{ marginRight: '4px' }} onChange={handeCommentChange} />
          <button onClick={handleCommentAddition(ids)}>add comment</button>
        </>
      ) : null}
    </>
  );
};
We pass the ids to the handleCommentAddition function and it will handle where to store the new comment.
Recursion to the rescue!
The idea of adding a new comment to the right place in the list of comments is actually pretty simple. We need to go over the ids and go through all the replies until there are no more ids. The ids are empty, which means we finally found the right place to add the comment.
Let's start with this base case: when the ids are empty, it means we can add the new comment to the list.
if (ids.length === 0) {
  return [...comments, comment];
}
This works perfectly for the comment in the root. But let's handle all the nested replies now.
const addNewReply = (comments, ids) => {
  if (ids.length === 0) {
    return [...comments, comment];
  }

  const id = ids.shift();
  comments[id].replies = addNewReply(comments[id].replies, ids);
  return [...comments];
};
- We have the base case handled
- We get the first id from the
ids.- Using
shiftis likepopbut it removes the first element of a list and returns it. - It's cool because we need to get the first and remove it from the list to keep going over all the
ids
- Using
- We recursively call the
addNewReplyby passing therepliesascommentsand theidswithout the removed id - We return a copy of the
commentsusing the spread operator
Now that the addNewReply is done, we can call it from the handleCommentAddition function
const handleCommentAddition =
  (ids = []) =>
  () => {
    setComments(addNewReply(comments, ids));
  };
It will return a new copy of the comments but now with a new comment added to the right place in the list.
The complete provider now looks like this
const CommentsProvider = ({ children, initialComments }) => {
  const [comments, setComments] = useState(initialComments);
  const [comment, setComment] = useState();

  const addNewReply = (comments, ids) => {
    if (ids.length === 0) {
      return [...comments, comment];
    }

    const id = ids.shift();
    comments[id].replies = addNewReply(comments[id].replies, ids);
    return [...comments];
  };

  const handeCommentChange = (event) => {
    setComment({
      text: event.target.value,
      author: 'TK',
      edited: false,
      replies: [],
    });
  };

  const handleCommentAddition =
    (ids = []) =>
    () => {
      setComments(addNewReply(comments, ids));
    };

  const providerValue = {
    comments,
    handeCommentChange,
    handleCommentAddition,
  };

  return (
    <CommentsContext.Provider value={providerValue}>
      {children}
    </CommentsContext.Provider>
  );
};
You may be thinking: “Well, the deletion may be very similar to the addition process” and you are right! We can use pretty much the same idea of ids together with the recursion process to find the right place we want to delete a given comment.
const removeReply = (comments, ids, index) => {
  if (ids.length === 0) {
    return comments.filter((_, id) => id !== index);
  }

  const id = ids.shift();
  comments[id].replies = removeReply(comments[id].replies, ids, index);
  return [...comments];
};
The removeReply is basically the same idea. The only different part is that we remove the comment and we do this by filtering the comment out of the comments list.
const handleCommentDeletion = (ids, index) => () => {
  setComments(removeReply(comments, ids, index));
};
We call it here in the handleCommentDeletion as the function to be provided to the components. It receives the new copy of the comments state and sets it using the setComments function.
Now the whole provider will look like this:
const CommentsProvider = ({ children, initialComments }) => {
  const [comments, setComments] = useState(initialComments);
  const [comment, setComment] = useState();

  const addNewReply = (comments, ids) => {
    if (ids.length === 0) {
      return [...comments, comment];
    }

    const id = ids.shift();
    comments[id].replies = addNewReply(comments[id].replies, ids);
    return [...comments];
  };

  const removeReply = (comments, ids, index) => {
    if (ids.length === 0) {
      return comments.filter((_, id) => id !== index);
    }

    const id = ids.shift();
    comments[id].replies = removeReply(comments[id].replies, ids, index);
    return [...comments];
  };

  const handeCommentChange = (event) => {
    setComment({
      text: event.target.value,
      author: 'TK',
      edited: false,
      replies: [],
    });
  };

  const handleCommentAddition =
    (ids = []) =>
    () => {
      setComments(addNewReply(comments, ids));
    };

  const handleCommentDeletion = (ids, index) => () => {
    setComments(removeReply(comments, ids, index));
  };

  const providerValue = {
    comments,
    handeCommentChange,
    handleCommentAddition,
    handleCommentDeletion,
  };

  return (
    <CommentsContext.Provider value={providerValue}>
      {children}
    </CommentsContext.Provider>
  );
};
The <DeleteCommentButton /> component will now have access to the handleCommentDeletion function and can be used when the user clicks the delete comment button.
const DeleteCommentButton = ({ ids, index }) => {
  const { handleCommentDeletion } = useContext(CommentsContext);
  return <button onClick={handleCommentDeletion(ids, index)}>X</button>;
};
We pass all the ids and the index of the comment to be deleted.
And that's it! We completed the whole API. We can render all the comments and nested replies, add new comments and replies, and delete comments and replies.
Challenge
To go even deeper, try these challenges:
- Enable a different author to comment or reply to a comment
- Enable a comment update
Crafting Frontend is a series of posts and experiments I'm doing to craft the art of frontend engineering. To see all the experiments I've been doing, follow the Crafting Frontend github repo.