Web performance, code splitting strategies, and a React case study
 Photo by Orane Thomas
In the early days of the internet & JavaScript, web developers usually handled user interactions with simple JavaScript scripts.
Using the <script> tag to let browsers load and execute JavaScript code. It was very useful to handle form validations in the frontend and make the pages a little bit more interactive.
jQuery made it easier and more accessible to build interactivity on web pages. We had two ways of using it on browsers. The first one was to download the jQuery script, add it to the project, and point the <script> tag to load and execute it. The second one also uses the <script> tag but now points to a CDN url for the jQuery library.
At the time, we didn't have an organized approach to installing and using libraries. We didn't have npm. And now we have npm, yarn, pnpm to help us manage our dependencies, making it easier to install and maintain the libraries we want to use in a project.
Not only dependency managers but also build tools are used in modern frontend applications nowadays. Tools like webpack, vite, esbuild, rollup, and so many more interesting "bundlers".
In the end, these bundlers will produce a final "bundle" and sometimes multiple JavaScript chunks too. In SPAs is usual to have a tiny HTML file served by the server and a script tag to download your entire frontend application, or at least a big part of it.
If we don't manage this well, this final bundle can be huge in size (think >10mb). The 1993 research by Jakob Nielsen, “Response Times: The 3 Important Limits”, explains the importance of performance from the perspective of users. He talks about the three "time limits":
- 0.1 second is about the limit for having the user feel that the system is reacting instantaneously, meaning that no special feedback is necessary except to display the result.
- 1.0 second is about the limit for the user's flow of thought to stay uninterrupted, even though the user will notice the delay. Normally, no special feedback is necessary during delays of more than 0.1 but less than 1.0 second, but the user does lose the feeling of operating directly on the data.
- 10 seconds is about the limit for keeping the user's attention focused on the dialogue. For longer delays, users will want to perform other tasks while waiting for the computer to finish, so they should be given feedback indicating when the computer expects to be done. Feedback during the delay is especially important if the response time is likely to be highly variable, since users will then not know what to expect.
This research is interesting because it puts performance not only as an engineering endeavor but also gives a user-centric perspective of how performance has a close relationship with UX.
Now, going back to web development, the growing use of JavaScript in the frontend is making it more and more complex, not only in the engineering/codebase perspective but also in web performance. In general, we can say that, if we ship more JavaScript to the final bundle, the size of the file gets bigger, and the download time increases.
Code splitting strategies
In this post, I want to talk about one of the techniques we can take to reduce JavaScript in the final bundle: Code splitting.
Code splitting is the process of splitting the bundle into multiple, smaller bundles (also known as JavaScript chunks).
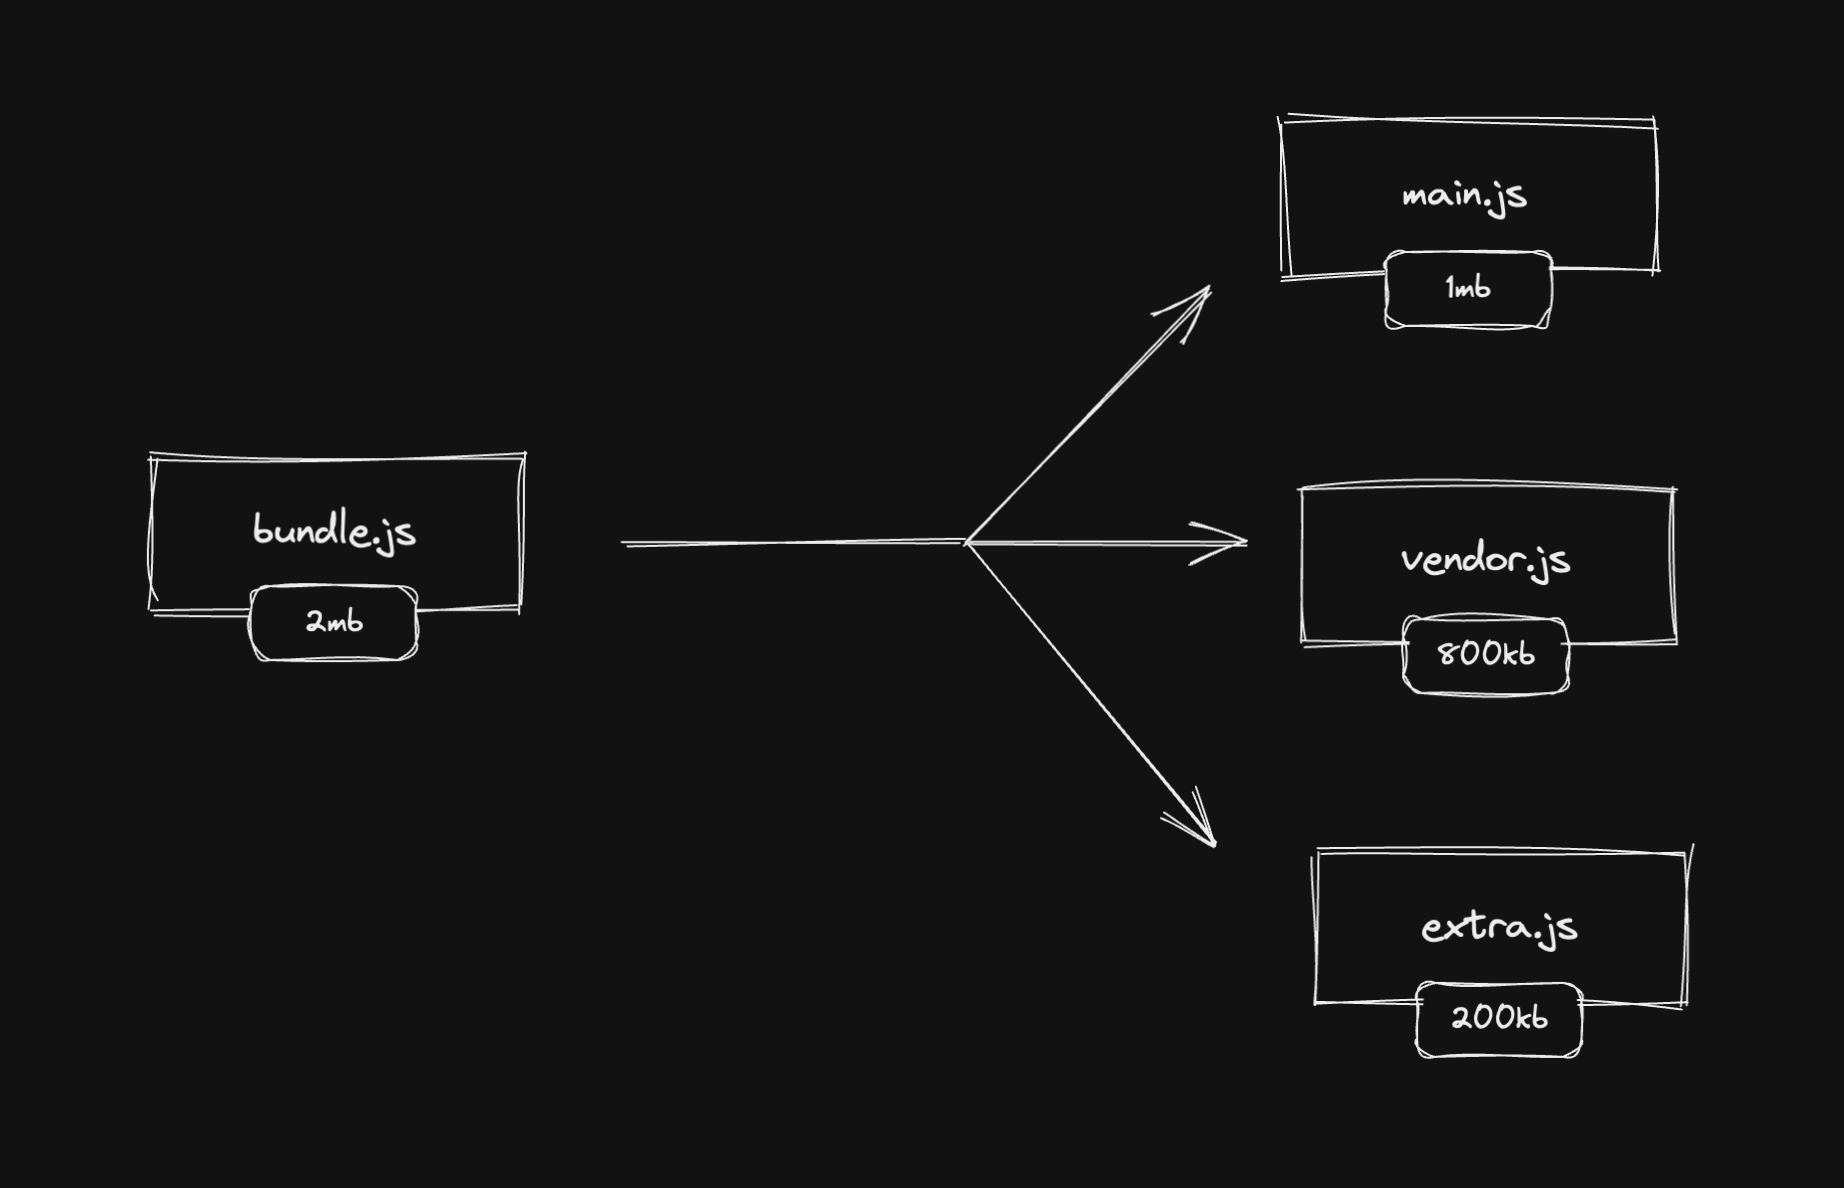
But splitting into smaller bundles can have no effect on performance and UX improvements. We can use this technique together with some strategies to optimize web performance and improve the perceived performance from the user's perspective.
In this post, we'll talk about three of them: code splitting by page (or route), split below-the-fold code, and conditional content like modals, popups, side menus, etc.
Code splitting: by page
Imagine you have a Home page and a Search page. Every time you load the Home page, the bundle will also contain code from the Search page. It's not ideal as we are making the user downloads JavaScript (and other assets) that are not necessary to render the Home page.
What if we could split the Home page into a Home.js bundle and the Search page into a Search.js bundle? This way we would load only the Home.js bundle when the user reaches the Home page. The same for the Search page and the Search.js bundle.
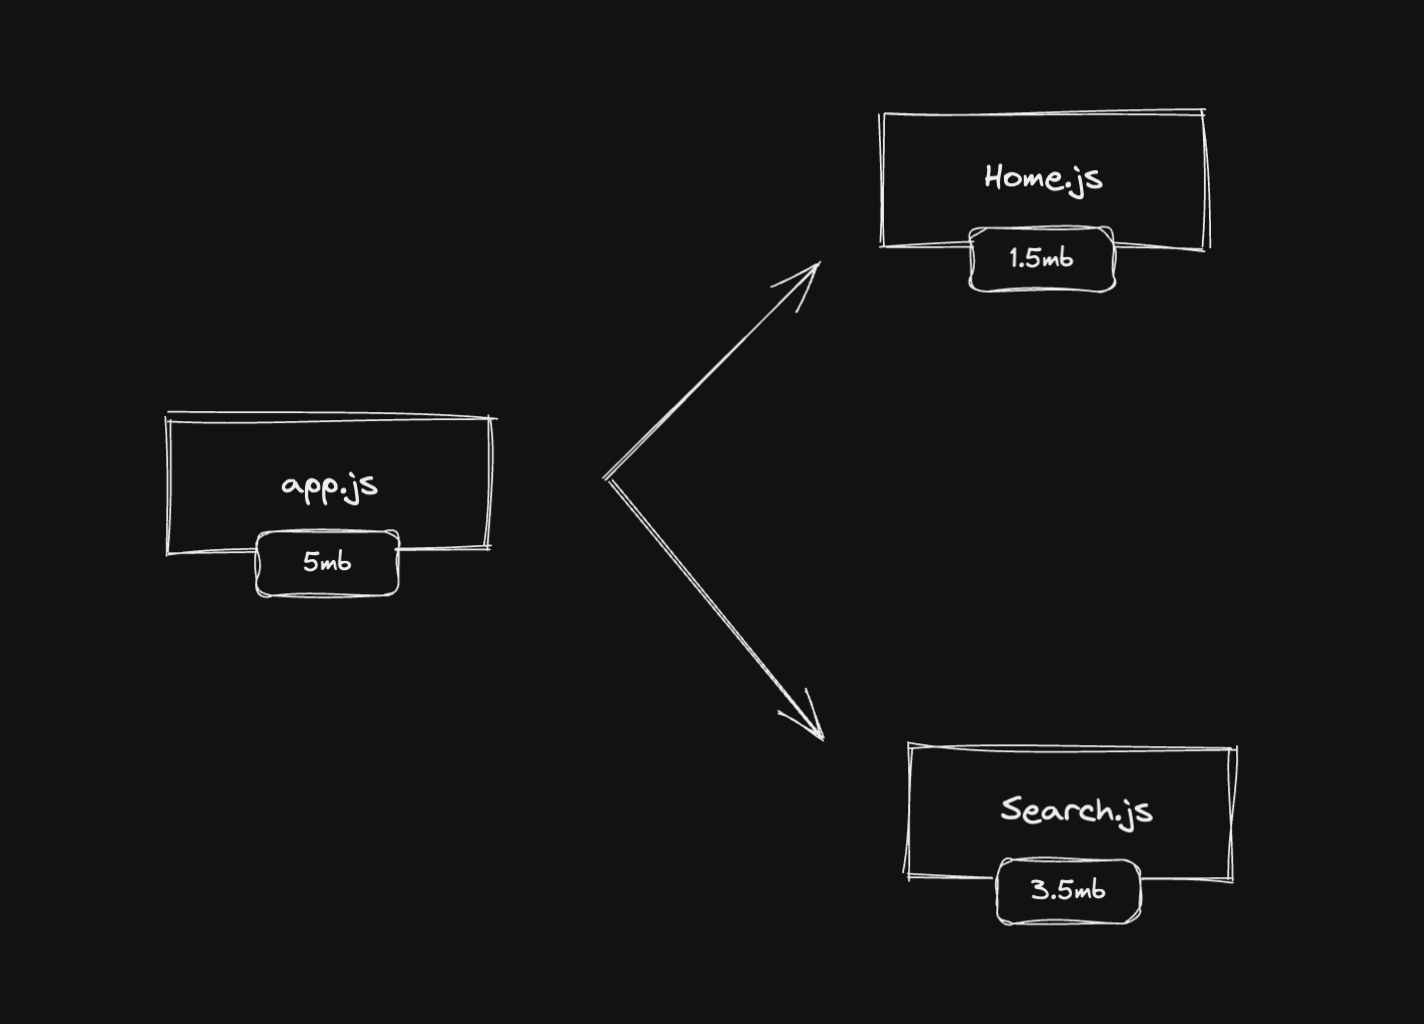
This is exactly what code splitting by page (or by route) is. We use routes as entry points to create new smaller bundles that will be served only when we need to serve them.
When you split your app's bundle into separate bundles by page, you are drastically reducing the size of your final bundle and you're serving only the necessary JavaScript per page.
In the illustrated image above, we can see that we are potentially reducing 3.5mb of JavaScript on the home page and 1.5mb on the search page. And that's a huge improvement!
Code splitting by page is pretty common and I would guess that most of the frontend engineers know about this strategy and use it in their favor to improve their app's performance and UX.
Code splitting: below the fold
In the same idea as downloading only the necessary JavaScript, we want to use a strategy of splitting the bundle into an "above the fold" bundle and a "below the fold" bundle.
Imagine you are working on a landing page. The visible section after loading the page is showing the page header, the form, and a big hero image. We can call it the "above the fold" section. Everything that's not in this fold, it's "below the fold".

The user doesn't care about the "below the fold" sections because the most important section in the first load is the "above the fold" section. The strategy here is to split the "below the fold" sections into a new bundle and download this JavaScript when the user scrolls down and reaches this section.
How would you do it? The answer is pretty much using the Intersection Observer API. This API "provides a way to asynchronously observe changes in the intersection of a target element with an ancestor element or with a top-level document's viewport". We can use it to detect the visibility of a given element, in this case, the "below the fold" sections.
Imagine we wrap the "below the fold" sections into a div that has the id "below-the-fold". With the Intersection Observer API, we can make it observe this target element and when it's intersecting with the viewport, we make it download the new separate bundle.
const callback = (entries, observer) => {
  entries.forEach((entry) => {
    // entry.isIntersecting
  });
};

const options = { threshold: 1.0 };
const observer = new IntersectionObserver(callback, options);
const target = document.querySelector('#below-the-fold');

observer.observe(target);
The API is pretty straightforward:
callback: for each entry, we want to know if the target element is intersecting with the viewportoptions: the threshold represents the percentage of visibility of the target.target: the element we want to observe
With this code, we can pretty much download any new JavaScript bundle if the target element is intersecting with the viewport, and then reduce the app's bundle and download subsequent bundles on demand. That's powerful.
Code splitting: conditional content
Again, we are still following the same concept here: loading only the necessary JavaScript code and splitting the other parts into separate smaller bundles.
Conditional content we can think of as side menus (doesn't appear in the first render), popups (like ads, promotional content, etc), or dialogs (like login dialogs if you click the login button).
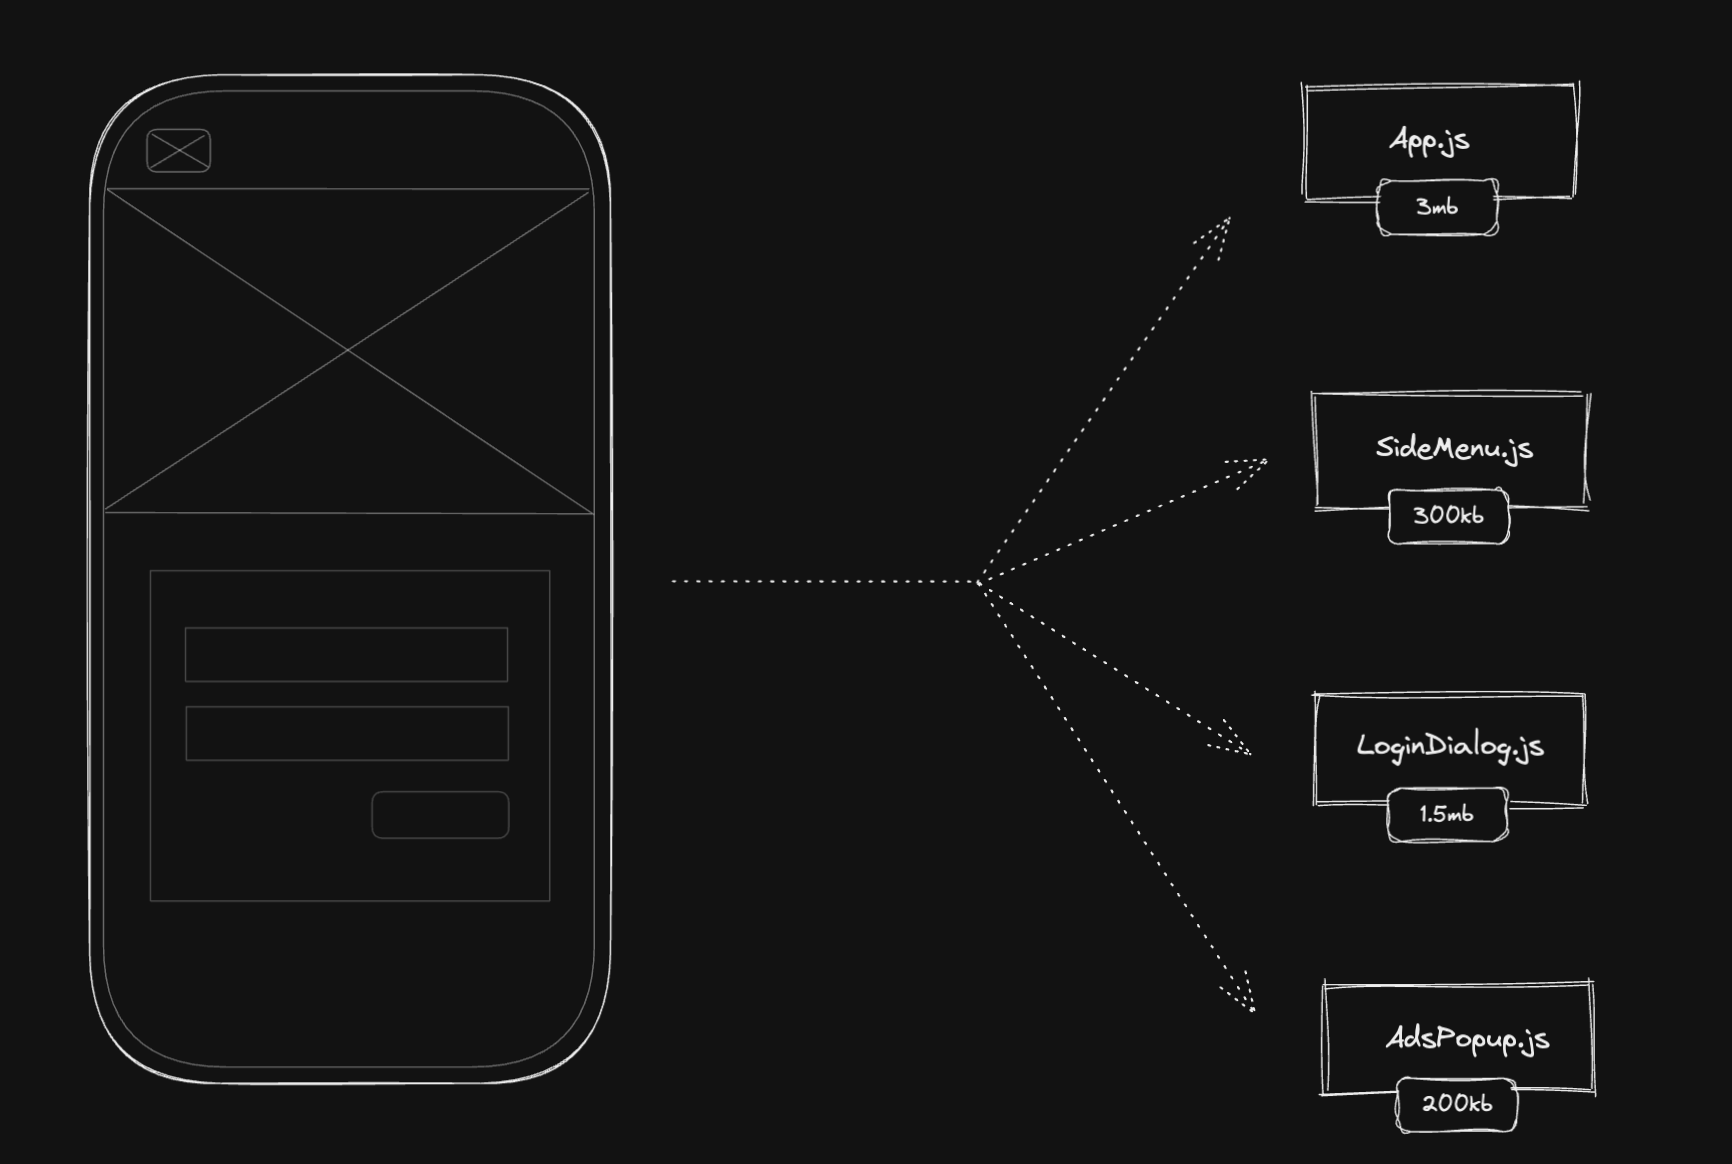
We only want to download these JavaScripts if the condition evaluates to true. In the illustrated image above, we have App.js, SideMenu.js, LoginDialog.js, and AdsPopup.js. If not code split, the page would download 5mb but with the conditional code splitting strategy, we can reduce by around 40% the size of the JavaScript bundle (~2mb less JavaScript in this case). It would be a huge improvement in the load and execution time.
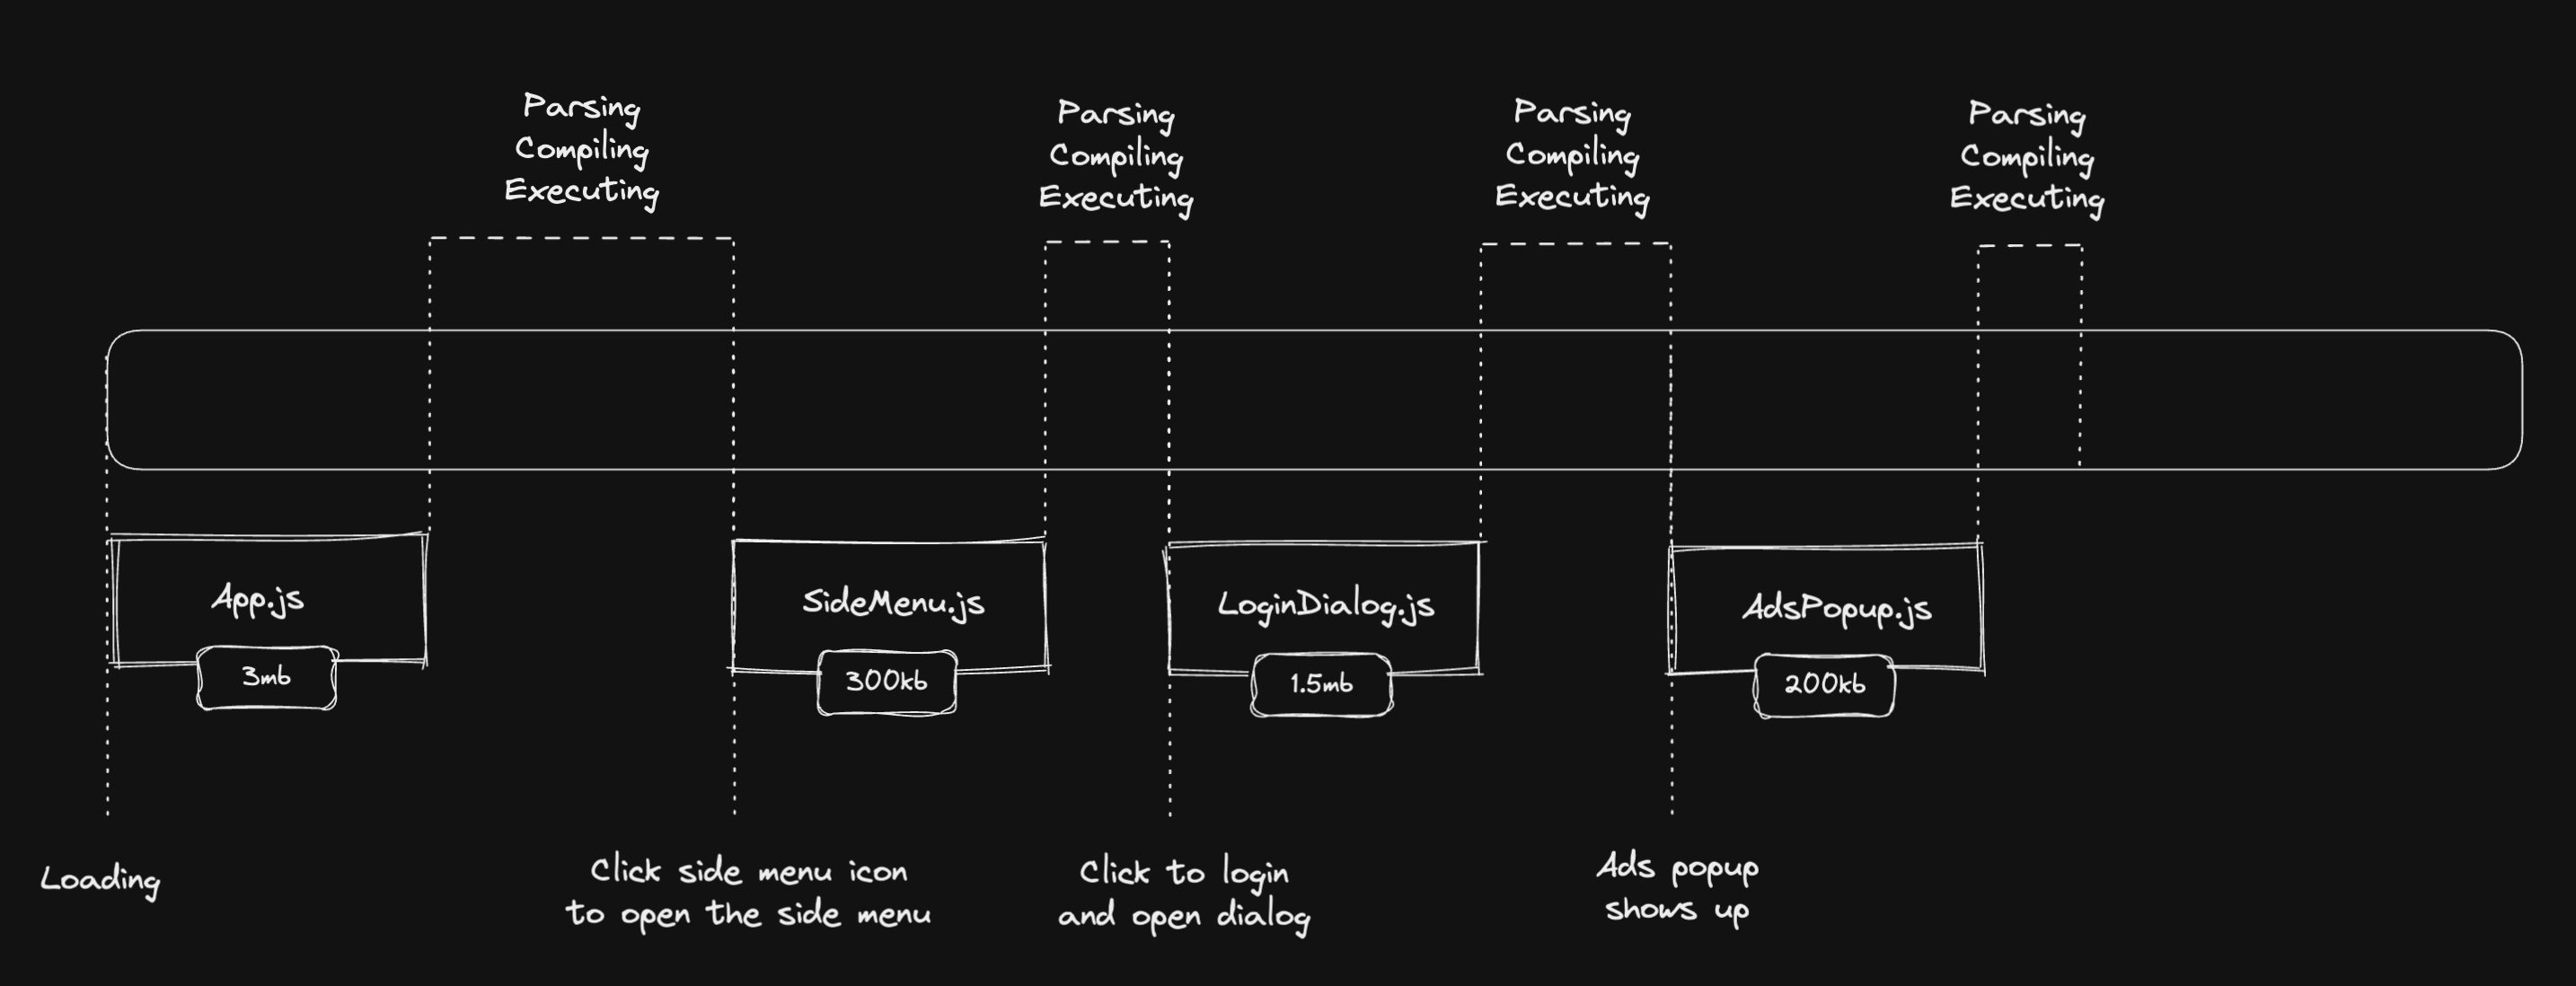
In the first render, the app will only download, parse, compile and execute the App.js bundle, reducing it from 5mb to a total of 3mb. If the user clicks the side menu icon, it needs to download the SideMenu.js bundle to open it. The same thing for the LoginDialog.js and the AdsPopup.js.
We can see that we only download (parse, compile, and execute) the separate bundles on demand, when the user requires the app to have the code.
Code splitting: browser caching
One of the cool things we get for free when we do code splitting is the browser caching capability. As you already know, when we do code splitting, we create a separate bundle and the browser downloads it, the bundle will be cached for further downloads.
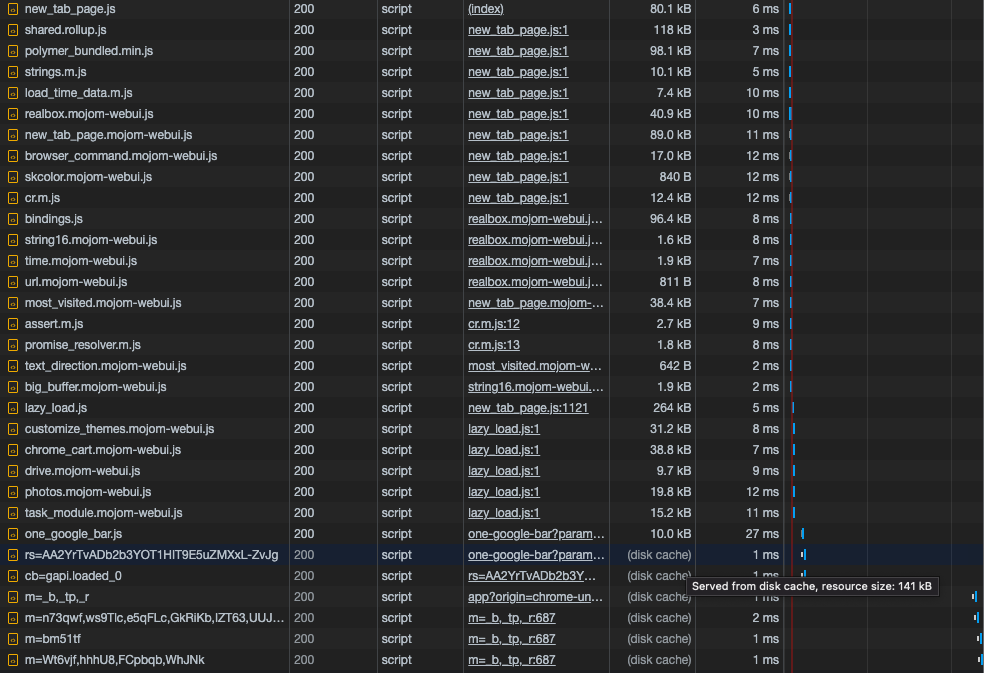
To do this experiment, get your app now, or any other website you use, open the DevTools, and select the network tab.
Select the JS to filter only this type of file in the network tab list. Reload the page for the first time and you'll see all the JavaScript that's being downloaded. Reload the page one more time (not a hard reload, nor a "clean cache and reload") and you'll see the size of some of the JavaScript in the Devtools, and they don't show the size anymore. They show a (disk cache) text. If you hover over this text, it will show a tooltip saying "Served from disk cache".
This caching strategy is nice to be used for the code splitting we talked about before, but also for other types of code splitting. One of the most common is code splitting big libraries or dependencies into their own separate bundle.
So, imagine that you like functional programming and you use ramda, you can code split this library into a new bundle. Every time a page needs this library, it will try to download this new bundle. After the first time, it will be cached in the browser, so if the user accesses the page again, it won't download the bundle anymore, it gets from the cache. The cost will be probably ~1ms/2ms.
This is interesting because the library can be used on different pages of the product and as it's already cached, it won't penalize the user again. We, engineers, don't bump libraries versions that often, so the probability of this library being cached for the users for a long time is very high.
If you apply this same strategy to a list of the biggest libraries in your codebase, it will save more time for recurrent users. I showed an example of this approach in a React application using webpack and the CommonsChunkPlugin: Optimizing the Performance of a React Progressive Web App — Caching Biggest Dependencies.
Code splitting in React applications
In React applications, we have different approaches to do code splitting. The most common ones are: using React.lazy, using loadable-components, and using react-loadable.
All three are very similar in syntax and the result is pretty much the same. Or almost the same. I have used react-loadable before but it's not maintained anymore, so I won't focus on that. In this post, we'll see examples using loadable-components as I have never used React.lazy before.
Code splitting: by page
Let's say we have a product with a Home page and a Search, the same way we talked before:
We want our app to be split into two separate bundles, one for the home and the other for the search.
To do this using the loadable-components lib, we can just create loadable components and dynamically import both search and home components.
import loadable from '@loadable/component';

const Home = loadable(() => import('./Home'));
const Search = loadable(() => import('./Search'));
One caveat: both Home and Search components need to be default exported. If they are only exported using named export, it won't work (not only in loadable-components, but also in react-loadable and React.lazy).
After creating these components, we can use them on our routes. As we want to code split them per page.
If you are using react-router, the code would look like this:
<Switch>
  <Route exact path="/" component={Home} />
  <Route exact path="/search" component={Search} />
</Switch>
Now, when the user accesses https://domain.com, it will download only the home bundle and not the search one. If the user accesses https://domain.com/search, it will be the other way around: downloading the search bundle but not the home.
We can make sure this works by looking at the network tab on the DevTools. There, you'll see all JavaScript being downloaded. Don't forget to filter by JS to make it easier to see JavaScript-related bundles only.
Code splitting: below the fold
Cutting JavaScript that is below the fold and putting it in a separate bundle is a pretty nice strategy to reduce the bundle and serve only the necessary JavaScript to the user.
As we already talked about, we can implement that using the Intersection Observer API. I have already shown a simple code snippet on how to use the API but now I want to show an example in React. The concept is pretty much the same though.
I will show an example using a nice library called react-intersection-observer. The API is super simple to use and reason about. Take a look at it:
import { useInView } from 'react-intersection-observer';

const Component = () => {
  const { ref, inView } = useInView();
  // ...
};
For any component, we can use this hook and get interesting information from the observer. But the most important ones, at least for our performance case now, are the ref and the inView.
They have a pretty good naming and you can get from it. The ref is the reference of the component or element you want to observe. We can call it your target element as you need to assign this ref to the DOM element you want to monitor. And the inView is just a boolean telling you if this target element is in the intersection with the viewport or not.
If you want to try this out, consider creating a new component, and logging the inView in the console to see if it's working correctly. Try this out:
import React from 'react';
import { useInView } from 'react-intersection-observer';

const Component = () => {
  const { ref, inView, entry } = useInView();
  console.log({ inView });

  return <div ref={ref}></div>;
};
Now, every time you reach this component when scrolling down (or up) the page, you see a { inView: true } in the DevTools console. Pretty nice, uh?
Now, back to the code splitting strategy. Imagine you have this "below the fold” component:
const Component = () => {
  return (
    <div>
      <h2>Below the fold title</h2>
      <p>Another code splitting strategy</p>
      // ...
    </div>
  );
};
We want to download the JavaScript only when the user reaches this component that's below the fold, right? The first step is to extract this component into a separate bundle. We do that the same way we did for the code splitting by page strategy, using the loadable-components.
Extract the component into a new file and default export it:
const Component = () => {
  return (
    <div>
      <h2>Below the fold title</h2>
      <p>Another code splitting strategy</p>
      // ...
    </div>
  );
};

export default Component;
Create a loadable component that will dynamically import it
import loadable from '@loadable/component';

const LoadableComponent = loadable(() => import('./Component'));
With that, we can now use it in the target element we will be monitoring.
import React from 'react';
import { useInView } from 'react-intersection-observer';
import { LoadableComponent } from './LoadableComponent';

const Component = () => {
  const { ref, inView } = useInView();

  return <div ref={ref}>{inView && <LoadableComponent />}</div>;
};
Again using the useInView hook, assigning the ref to the target DOM element, and using the inView boolean to know if the component is in the intersection with the viewport or not. If it's, it will evaluate to true and render the LoadableComponent. Now the loadable will dynamically import the "below the fold" component, the browser will download the separate bundle, and it will be rendered for the user.
It's just a small example but it shows the whole concept. We can use it for any other type of component that's below the fold. We can make the bundle more granular or put everything in the same "below the fold" bundle.
Code splitting: conditional content
The conditional content is very similar to the below the fold strategy. The concept is to code split components that are not visible in the first render, create a new separate bundle for them, and download them when the user wants to see this content.
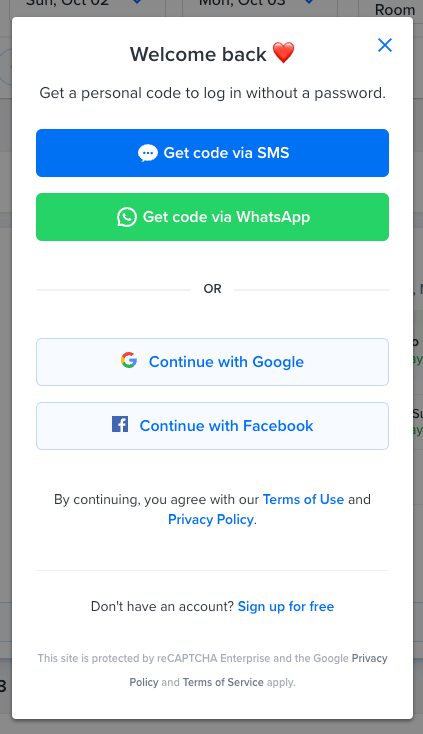
One common example is Modals (or overlays, or dialogs, … so many names for the same thing❓). In the first load, the modal shouldn't be downloaded together with the main bundle. The user doesn't even know if exists yet. So we separate it into a new bundle and when the user clicks something to open this modal, we download it, and render it to the screen.
To the code! We start separating the modal component into a new file:
const Modal = ({ isOpen }) => (
  <Container isOpen={isOpen}>
    <Header />
    <Content />
  </Container>
);

export default Modal;
Now we create the loadable:
import loadable from '@loadable/component';

export const Modal = loadable(() => import('./Modal'));
With the two components created, now we should just render this modal when it should be open. If it's not open, we don't want to penalize the user with more JavaScript being downloaded. We can even use the isOpen flag to handle this condition for when to load and render the modal or not.
import { Modal } from './Modal';

const Page = () => {
  // get the isOpen somehow

  return (
    <div>
      // ...
      {isOpen && <Modal isOpen={isOpen} />}
    </div>
  );
};
Simple as that.
React application case study
I'm currently working on an almost-5-year-old codebase, so you can probably imagine the complexities, the number of features, and the number of engineers who have worked on it.
Thanks to my colleagues, we have a very healthy codebase. But we saw a lot of potential for improvements. This was collected from an internal engineering survey.
When growing complexities and features on a codebase, it gets really easy to have performance regressions if you are not focused on that.
When I started working on this codebase, I also saw a lot of potentials when it comes to web performance. I started profiling and optimizing some runtime performance issues. Seeing core web vitals metrics and the final webpack bundle, it was easy to understand some problems.
In this case study, I want to show one part of the strategies I'm taking to optimize the performance of this product. As code splitting is the topic of this article, in this case study, I will cover code splitting related optimizations only. But there are many other things on the roadmap to improve and I can talk more about them in a future post.
The optimizations done are for:
- Code splitting — by page: search, home, account, membership, and other pages
- Code splitting — below the fold: footer
- Code splitting — conditional content: login dialog, hotel details overlay
Code splitting by page
Some of the pages were not code split so it was an easy win to separate them into their own bundle and serve it only when they are in need. No more home-related code being downloaded when the user reaches the search page, and vice versa, and for other pages too.
All the pages that needed code splitting were the home, search, account, membership, and some other places but not much difference in the final bundle.
As we already talked about in this post, I just needed to create loadables and use them in each route. Simple as that.
Below the fold code splitting
The footer is a section used in all packages, it can be code split and this chunk would be downloaded only when the user scrolls down the page and reach the end of the page.
Using the intersection observer, we can track if the user reached the end of the page the same way explained here.

Another great benefit is caching. After the first download, the new separate chunk is cached in the browser, so every time the user goes to another page that uses the footer, it’s already cached in the browser and it doesn’t need to download again.
Conditional content code splitting
The most impactful result I had was code splitting the login dialog. This component is only shown to guest users (unlogged users) who click on the login button to open it.
This code split reduced the bundle by ~126.81 KB, gzipped. It is a huge component because it handles a lot of cases: sign up, sign in, and the unlocking flow.
For the authenticated users, it's even better because they don't need to download this whole component again.
I used the very same strategy for all other conditional content that we show to the user on the search page.
It includes components like the hotel details overlay (it's shown when the user clicks the hotel card), the search filters popup (it's shown when the user interacts with the search filters to select deals that fit their need), language and currency selectors (it's shown when the user needs to run the website in different currencies or language), and some other smaller components.
Improvements and Results
Reduced 430.11 KB in the final bundle. It is around ~30% less JavaScript we are shipping in the main bundle. Huge improvement. As I'm still running this experiment, I want to gather more data to have a clear view of the optimizations. But the metrics I'm focusing on are:
- Largest Contentful Paint / Loading time: tracking load time
- First Input Delay / Total Blocking Time: tracking user interactivity
- Business metrics: our custom engagement and conversion metrics
I can also look at other metrics here but this is a good start for these improvements. Let's see how it goes and I can update this article in the future.
Resources
If I need to go to one place to learn web performance, it's the web performance research repository. It's a compilation of all articles, videos, courses, and any other resources I'm researching.
For this post, the articles that helped me doing these improvements are down below:
On bundling
- Bundle/code splitting revised
- 3 Code Splitting Patterns For Vue.js and Webpack
- Bundle Splitting
- The 100% correct way to split your chunks with Webpack
On react
Issues with splitting into many JavaScript bundles
If you are a visual person, I created this visual roadmap to learn web performance based on the webperf research repo: Web Performance Roadmap.
Well, this is it for today. I hope it can be helpful for you. Keep studying and coding! Until next time.